
Note: I only play games on the PC, so I may not be able to help with other platforms.
 |
Basics:
 Delicious: Emily's Honeymoon Cruise is one of the "Delicious" series of time management game. A customer's order will appear in a thought balloon over his head, and you play as a variety of characters, serving the customer by preparing the food or items. Generally, this simply requires clicking on the corresponding food/items, though there will be some that require multiple steps. The game will give you hints and directions for making new items unless you turn off that option in the settings.
Tip: This game contains an excellent basic tutorial before the first level; if you've not played one of the Delicious games before, I recommend you play it.
 |
| Ecstatic Customer |
As you play, you will get to know your customers and their level of patience. The overweight customers (know as "Foodies") and the Senior customers have the most patience and can be made to wait so you can make combos. Kids have the least patience.
When a customer arrives at the counter to pay, a thought bubble will show a stack of money and a stack of coins. The coins are the tip amount; as a customer decreases in happiness the tip amount will decrease as well.
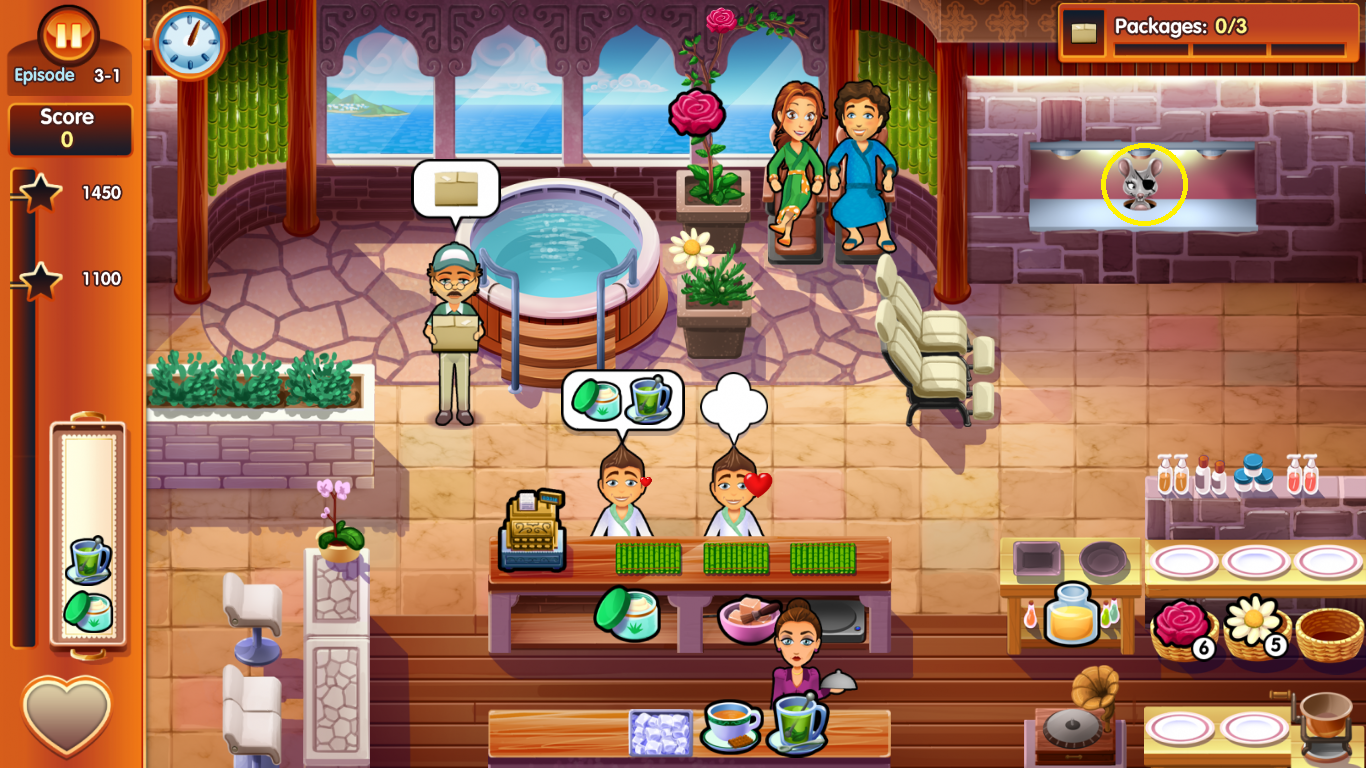
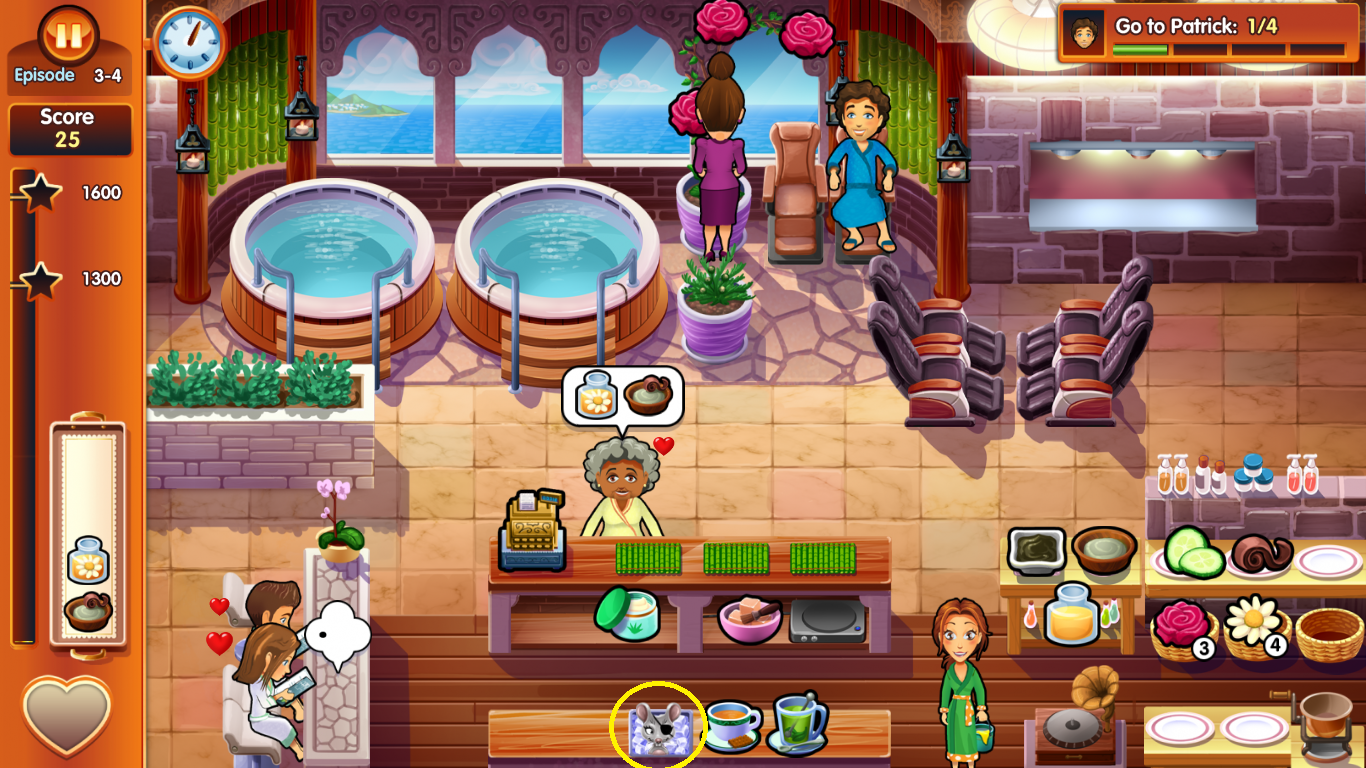
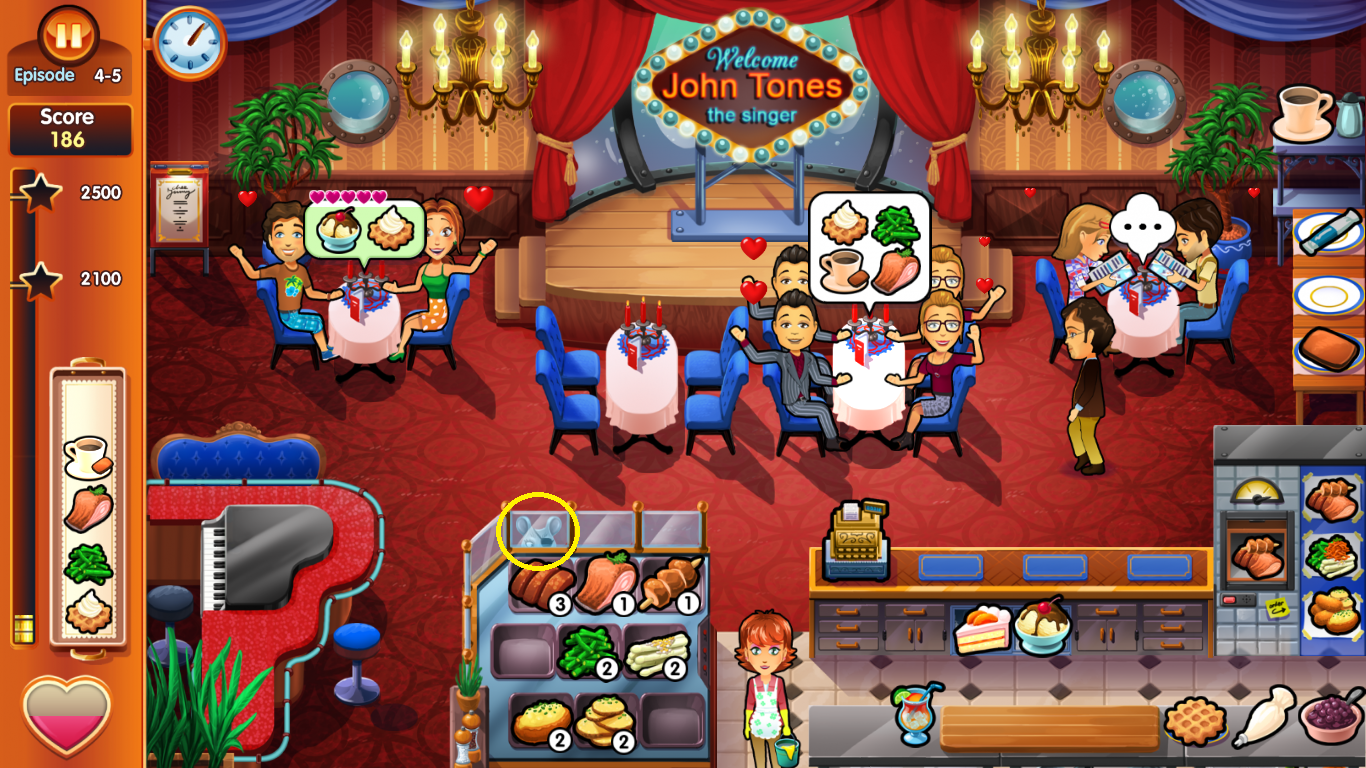
 The mouse will appear in each level. He appears for a few seconds, and you'll know he is there by the chittery-mousey sound that happens each time he shows up. (Sometimes you can see the mouse hole in the scene.) You will be rewarded +100 for clicking on him. If you don't find him right away, he will continue to come back until the end of the level. You will earn a collectable for finding him in every level. A screenshot has been provided for each level to show the mouse location.
Doing the same action twice or three times in a row (chaining) will help you achieve higher scores.
Chains can be earned by having two or three orders prepared on your tray, and serving them to the customers without an interruption* to do another task. Serving two customers gets you a bonus of +11, while serving three customers gets a bonus of +16. Chaining can also occur when using the cash register. When you check out two customers at the same time, you get a combo for +10, three customers together gives a bonus of +20. Note that this is not two customers in a row, but rather at the same time. When customers are ready to pay, they will stand at the counter; wait until you have two or three waiting to pay and one click of the cash register will take care of them all at once.
*Serving customer orders can be interrupted by using the cash register, and the chain will not be broken.
Note: Checking out the special couple (more about them later) at the same time as a regular customer will not result in a combo bonus.
Tip: Plan to serve complete orders only, as doing this will give you a bonus of +5 for a table of one, two or three customers, +10 for a table of four.
Certain days have events, which are tasks that need to be performed. Details of how to complete the challenge are provided. You do not have to complete the event to pass the level, but will earn extra points if you do.
The mouse will appear in each level. He appears for a few seconds, and you'll know he is there by the chittery-mousey sound that happens each time he shows up. (Sometimes you can see the mouse hole in the scene.) You will be rewarded +100 for clicking on him. If you don't find him right away, he will continue to come back until the end of the level. You will earn a collectable for finding him in every level. A screenshot has been provided for each level to show the mouse location.
Shopping credits are earned for completing the level, with an additional amount earned for achieving expert. This is used to by upgrades, with different items for each restaurant. You will earn 100 for completing a level with the target score and another 100 for an expert score.
Note: To purchase all the decorations in the game (and earn the collectable), you will have to achieve an expert score on each level to have enough shopping money.
Tip: The first episode on the Pool Deck can be successfully completed without upgrades, so if you wish you can save up your credits and be able to buy several upgrades for the Boutique at the first level.
Entertainers become available eventually in each restaurant, though some have to be purchased through the decoration shop. To use an entertainer, click on the entertainer and then the table you want the entertainer to visit. The entertainer will entertain for a few seconds and then that table will gain a heart; you will hear a particular sound that signals that happiness has been gained. Using an entertainer will not prevent a customer from loosing a heart.
Tip: Using an entertainer is especially helpful when you have a table waiting at the cash register so that you can have two or three tables pay at the same time for the bonus.
Golden Hearts and Memorable Moments

When a Memorable Moment is happening, a camera will appear on the screen. Click on it before it's meter runs out to capture it in your photo album.
Note: There seems to be a glitch in the game because on some levels you can earn a combo bonus serving them and on other levels you can't.

Note: To purchase all the decorations in the game, you will have to achieve an expert score on each level to have enough shopping money.

The Pool Deck: Episode 1
Episode 1-1To make the drink, click first the glass and then the lime slice. To restock the lime slices, click on the whole lime and Francois will slice it. You can have a maximum of five slices at a time. Clicking on an item or the register while Francois is slicing will interrupt him and he'll instead do the action you clicked.
Tip: Anytime someone goes into the pool and sits down, they will want a coin. You can have the coin on your tray before they ask for it and be able to make quick chains as a result.
Francois will have to clean the tables today. To do this, click on the dirty table and he will walk to it and clean it.
Note: The seats in the pool for the fountain and jet do not have to be cleaned.
Mouse location:

Episode 1-2
To make ice cream cones, click on the ice cream three times.
Today's event is to hand Jimmy the tools. When he requests one, click on it and Francois will walk to it and then take it to Jimmy. Locations marked below.


Episode 1-3
To make the shrimp, click on it and it will go to the grill. When it is finished cooking, the sizzling sound will stop. Click on the cooked shrimp and then the french fries to complete the dish. Don't leave the shrimp on the grill too long or it will burn.
Josh is available to clean tables now.
Mouse location:

Episode 1-4
Today's event is to serve Jimmy and Angela. When the request an item, take it to them. Serve them all their requests before the timer bar runs out. You will not receive a combo bonus for including their items in a chain.
Mouse location:

Episode 1-5
Mouse location:


The Boutique: Episode 2
Episode 2-1
To prepare the shoes, first click on the shoe and then on the shoelaces.
Mouse location:

Episode 2-2
Today's event is to fix the sewing machine. Click on it and Angela will walk over to it and begin to work on it. You can interrupt her by clicking on an item or the register. Send her back to work on it in between serving customers.

Coffee is added. This is a "pourable" item. To make the coffee, click on the coffee machine. A meter will begin to spin above it. When the meter hand is in the green, click on the machine again. If you let it get into the red, the coffee will spill and you'll have to start over. Angela can walk away from the machine to do something else while it is pouring, as long as you click on the meter in time.
Mouse location:

Episode 2-3
Today's event is to clean up the boutique by picking up the sewing tools/accessories hidden in the scene. Just click on it to clean it up. The locations of the items are below.

To make the green or yellow shirts and skirts, first click on the color of material you want to use and then on the white pattern of which garment you want made. Angela will then walk to the sewing machine and sew it. This will add two garments to the stack. You can have a maximum of five garments stacked at a time.
Mouse location:

Episode 2-4
To make the charm bracelet, click three times on the shamrock charm. In later levels, there will be several charms available.
Mouse location:

Episode 2-5
There are now three charms available for charm bracelets, so pay close attention to what the customer orders. To make a multi-charm bracelet, click on the charms in order from left to right.
Tip: Charm bracelets will only be either three of a kind, or three different charms. If it is different charms, the charms will always be in order from left to right.
Mouse location:


The Spa: Episode 3
Note: The Jacuzzi will not have to be cleaned in the Spa.Episode 3-1
Today's event is to accept the three packages. If you wait too long, the delivery man will leave.
Brigid will have to clean today.
To make the bath salts, first click on the jar, then click on the appropriate flower. You will need to restock your roses and chamomile by picking them. To pick the flowers, just click on one of the blooms of the needed flower and Brigid will walk over and pick them. They will slowly regrow. You can stock a maximum of six at a time.

The wax is prepared like a pourable item. To make the wax, click on the pink bowl of wax. It will move to the stove and melt. A meter will begin to spin above it as it melts. When the meter hand is in the green, click on the bowl again. If you let it get into the red, the wax will ruin and you'll have to start over. Brigid can walk away from the wax to do something else while it is pouring, as long as you click on the meter in time.
Mouse location:
Episode 3-2
To make the facial, click first on the dish, then on the ingredient. (There will be more choices as the levels progress.)
Mouse location:

Episode 3-3
Emily will clean tables today, leaving Patrick on his own. He can be sat at the single chair at the drinks table, since he is alone.
Mouse location:


Episode 3-4
Today's event is to talk with Patrick. He will raise his hand and think of Emily. Click on him and she will walk over and talk to him.
Mouse location:
Episode 3-5
An eye mask is now available, which needs to be frozen. Click on it and it will go onto the ice. It will change color and make a noise when it is ready.
Tip: For now, as there is only one type of mask, you can keep one frozen on the ice so that it is available as soon as it is ordered.
Mouse location:


The Piano Lounge: Episode 4
Episode 4-1To restock the meats, click on the meat icon on the dumbwaiter. The meat will arrive in a few seconds. Click on it and it will add to the meat stack. You can have a maximum of five pieces in a stack.
To make the waffle, first click on the waffle and then on the topping.
Don't miss the single customer at the piano bar. That table does not need to be cleaned by Evelyn after the customer leaves.
Mouse location:

Episode 4-2
Potatoes are now available and are refilled the same way as the meat.
Coffee is now available. Click first on the cup, then on the additional item to be served.
Mouse location:

Episode 4-3
Today's event is to find the ten roses. Locations shown below.
Note: The rose in the dumbwaiter won't appear until you use the dumbwaiter.
Mouse location/Rose locations

Episode 4-4
The event for this level is to build the sign. Click on the cardboard box on the stage and Edward will begin to build it. To interrupt him, click on any food item or the register. Keep sending him back until the sign is completed.
Vegetables are now available and are served and restocked the same way as the meat and potatoes.
Mouse location:

Episode 4-5
Mouse location:

The Kid's Club: Episode 5
Episode 5-1The event for this level is to find the "tools" for Emily when she requests them. The locations are marked below. Click on whatever Emily requests and then click on Emily for Patrick to pick it up and take it to her.

 Patrick will have to clean the tables as well as serve the children, so plan accordingly.
The special couple for this location is not Emily and Patrick, but the two children (Emma and Eric) sitting on the bench. Treat them just as you would Emily and Patrick.
To make the popsicles, first click on the stick and then on the appropriate mold. It will then appear on the ice. It will change color and make a noise when it is frozen. It can stay on the ice until needed, so before you have a choice of three you can make them in advance.
Note: Children are very impatient, so making them wait to achieve combos may not always be in the best interest of your score.
Mouse location:

Episode 5-2
Clay is now available. The child will request one, two or three pieces of clay. (Other colors will become available eventually, but only one color will ever be requested at a time.) To prepare the clay, click on the jar and one piece will go into the empty jar. Click one, two or three times depending on how many pieces you need. When you have enough pieces, click the jar that holds the pieces and it will go to your tray.
Mouse location:
Mouse location:

Episode 5-3
The event for this level is to catch Jayden. You must click on him quickly when he stops, or you will fail the event.
Tip: Take care of chasing Jayden before you start seating Emma and Eric, because it can be difficult to deal with both at one time.
To make cakes, first click on the requested shape. It will go into the oven to bake. The oven will ding when it is finished. Don't wait to long to click on it, or it will burn. Once you click on it, click on the appropriate icing and topping. It will then appear on the tray.
Tip: A second flavor of popsicle is now available. Since there are only two flavors, you can keep one of each flavor pre-frozen for quick service.
Mouse location:

Episode 5-4
Mouse location:


Episode 5-5
Mouse location:


The Beach: Episode 6
Note: Throughout all five levels of this episode, Brad will have to clean tables himself, so plan accordingly.
The meat can be requested in one, two or three pieces. Click on the first (far left) piece for just one piece, the second piece to serve two pieces together, or the third (far right) piece to serve the whole portion.
To make the salad, click on each ingredient in order from left to right.
To make a necklace click on the shells three times. The shells will need to be restocked, and will eventually grow on the beach on the top middle/right of the screen. You can tell when the shells can be collected, because a dark line will appear around the shell on the beach. Collecting shells will give you three at a time. You can have a maximum of nine stocked at a time.
Mouse location:

Episode 6-2
Mouse location:

Episode 6-3
The event for today is to talk to each of the ladies that come by the restaurant. Click on them when they enter; if you wait too long, they will leave and you'll fail the task.
To cook fish or crab, click on the appropriate one and it will go to the grill. It will flash and change color when it is cooked. Don't wait to long to click it or it will burn. Click on it and then on the requested seasoning.
To restock seafood, click on the bucket/fishing rod. Brad will walk over to it and fish; it is random which one he will catch. You can stack a maximum of five.
Mouse location:

Episode 6-4
The event for this level is to find the beads. Locations marked below:

Necklaces can now be made from flowers. They will need to be restocked by picking them (you only need to click on one and he'll pick all three); they will grow back slowly. You can stack a maximum of nine.
Mouse location:


Necklaces can now be made from flowers. They will need to be restocked by picking them (you only need to click on one and he'll pick all three); they will grow back slowly. You can stack a maximum of nine.
Mouse location:

Episode 6-5
The event today is to help build the sandcastle. When you seat Emily, Patrick will leave the sandcastle to come sit with her. Keep sending him back until it is finished.
Tip: Get your Golden Heart quickly, and before you start the sandcastle, then you can leave Patrick building until it is done.
Mouse location:


Note: John Tones is now available as an entertainer. Click on him, then on the table you want him to entertain. For more about entertainers, see the section on entertainers in the "Basics".
Episode 7-1
Mouse location:

Episode 7-2
The event for this level is to receive the boxes from the delivery man. If you wait too long, he will leave and you'll fail the task.
Edward will have to clean tables in this level.
The entertainer is not available on this level.
Lasagna can now be served in one or two portions.
Mouse location:

Episode 7-3
The event for this level is to feed John's friends. Serve all their requests before the timer runs out. The addition of their orders in a serving chain will not result in a combo bonus.
Mouse location:

Episode 7-4
Lasagna is now available in one, two, or three portions.
Mouse location:

Episode 7-5
Mouse location:


Episode 8-1
Smoothies are now available. This is a "pourable" item. To make the smoothie, click on the requested flavor. A meter will begin to spin above it. When the meter hand is in the green, click on the machine again. If you let it get into the red, the smoothie will spill and you'll have to start over. Brigid can walk away from the machine to do something else while it is pouring, as long as you click on the meter in time.
A third flower is now available. Pick the lavender and prepare the bath salts with it just as you do with the roses and chamomile.
Mouse location:

Episode 8-2
The event for today is to accept the roses. Don't wait too long, or the delivery man will leave and you will fail the task.
Customers can now order a sugar scrub. Click on the sugar cubes and they will go into the grinder; the noise will stop when it is ready. Don't wait too long to click on it, or the sugar will disappear.
Mouse location:

Tip: Get your Golden Heart quickly, and before you start the sandcastle, then you can leave Patrick building until it is done.
Mouse location:


The Piano Lounge: Episode 7
Note: Since you only have Emily to serve in this episode, you can use the single seat at the piano bar and not take up a table that a group of customers could be using.Note: John Tones is now available as an entertainer. Click on him, then on the table you want him to entertain. For more about entertainers, see the section on entertainers in the "Basics".
Episode 7-1
Mouse location:

Episode 7-2
The event for this level is to receive the boxes from the delivery man. If you wait too long, he will leave and you'll fail the task.
Edward will have to clean tables in this level.
The entertainer is not available on this level.
Lasagna can now be served in one or two portions.
Mouse location:

Episode 7-3
The event for this level is to feed John's friends. Serve all their requests before the timer runs out. The addition of their orders in a serving chain will not result in a combo bonus.
Mouse location:

Episode 7-4
Lasagna is now available in one, two, or three portions.
Mouse location:

Episode 7-5
Mouse location:


The Spa: Episode 8
Note: Since you only have Emily to serve in this episode, you can use the single seat at the bar and not take up a location that a group of customers could be using.Episode 8-1
Smoothies are now available. This is a "pourable" item. To make the smoothie, click on the requested flavor. A meter will begin to spin above it. When the meter hand is in the green, click on the machine again. If you let it get into the red, the smoothie will spill and you'll have to start over. Brigid can walk away from the machine to do something else while it is pouring, as long as you click on the meter in time.
A third flower is now available. Pick the lavender and prepare the bath salts with it just as you do with the roses and chamomile.
Mouse location:

Episode 8-2
The event for today is to accept the roses. Don't wait too long, or the delivery man will leave and you will fail the task.
Customers can now order a sugar scrub. Click on the sugar cubes and they will go into the grinder; the noise will stop when it is ready. Don't wait too long to click on it, or the sugar will disappear.
Mouse location:

Episode 8-3
Mouse location:

Episode 8-4
The event for this level is for Antonio to paint. Click on the easel for him to begin. Clicking on a station to clean will interrupt him. Keep sending him back until the task is complete.
Mouse location:

Episode 8-5
Mouse location:


The Boutique: Episode 9
Tip: With Emily being alone through this episode, it's a good idea to sit her at the single seat in the shoe department. That way, you aren't using up a location that more than one person can use.Episode 9-1
There are now a choice of three charms. Charm bracelets will only be made one of two ways: with all three charms the same, or with three different charms. The picture of the request will always show the charms in the same left-to-right order that they are on the counter. Click on the correct charms in order from left to right to make a bracelet.
Mouse location:

Episode 9-2
The event for this level is to give Angela the items requested by the notebook. The locations are marked below. Click on the item and Angela will walk to it and pick it up. Click on the notebook for Angela to take the item back to it.

Mouse location:

Episode 9-3

Mouse location:

Episode 9-3
Mouse location:

Episode 9-4
Episode 9-5

Episode 9-4
Mouse location:


Episode 9-5
The event for this level is to create the three outfits. Click on the exclamation point for Angela to begin. You can interrupt her by clicking on an item or the register. Just be sure to send her back to complete the clothes
There are new clothes available on the mannequins. These do not have to be restocked.
.
Mouse location:

The Kid's Club: Episode 10
Episode 10-1
Kids will now sit in front of the puppet show and request puppets, two at a time. Delivery and clean up is the same.
Mouse location:

Episode 10-2
Episode 10-3
Episode 10-4
There are new clothes available on the mannequins. These do not have to be restocked.
.
Mouse location:


The Kid's Club: Episode 10
Episode 10-1
Kids will now sit in front of the puppet show and request puppets, two at a time. Delivery and clean up is the same.
Mouse location:

Episode 10-2
The event for this level is to clean up the four messes. Click on it for Emily to begin. You can interrupt her any time by clicking on an item or the register. Just be sure to send her back in between customers until all four are finished. Four locations are marked below.
Mouse location/mess locations:

Mouse location/mess locations:

Episode 10-3
Emily will have to take care of the baby now, too. The baby will make requests by giggling; a thought balloon will appear over her head showing what she needs. If you don't bring her what she needs before the color runs out of the thought bubble, she will cry and Emily will have to hold her. Including her request in a chain will not result in a combo bonus.
The bottle will have to be warmed: click on the bottle and it will go into the warmer. When it is warmed, it will blink and make a noise. Don't wait too long or it will ruin and you'll have to make another bottle.
Mouse location:

The bottle will have to be warmed: click on the bottle and it will go into the warmer. When it is warmed, it will blink and make a noise. Don't wait too long or it will ruin and you'll have to make another bottle.
Mouse location:

Episode 10-4
In this level you have to catch Jayden. You must click on him quickly, or you fail the challenge.
Tip: Follow him around and catch him all seven times, while making your customers wait. If you try to serve customers in between, you may not catch him in time.
Emily will have to do the cleaning today, so plan accordingly.
Mouse location:

Episode 10-5
Tip: Follow him around and catch him all seven times, while making your customers wait. If you try to serve customers in between, you may not catch him in time.
Emily will have to do the cleaning today, so plan accordingly.
Mouse location:

Episode 10-5
There are two babies now.
Mouse location:


Pool rings can now be requested, and are kept on the upper left hand side of the screen. The customer will stand beside the upper part of the pool to request one. Click on it, then on the customer. When a customer uses it, it then appears on the lower left hand side of the screen, beside the pool. You will have to click on them for Francois to restock them.
Inflatables are now available. When a customer requests on, click on the appropriate one. A meter will appear; when the meter hand is in the green portion, click it again. If you wait too long, the inflatable will pop and you'll have to redo it.
Tip: Since Emily is alone, you can send her to the waterfall or water jet for a quick and easy way to earn the gold heart.
Mouse location:

Episode 11-2
The event for this level is to build the throne. Click on the throne for Francois to start; interrupt him by clicking on the register or any item.
Mouse location:

Mouse location:


The Pool Deck: Episode 11
Episode 11-1Pool rings can now be requested, and are kept on the upper left hand side of the screen. The customer will stand beside the upper part of the pool to request one. Click on it, then on the customer. When a customer uses it, it then appears on the lower left hand side of the screen, beside the pool. You will have to click on them for Francois to restock them.
Inflatables are now available. When a customer requests on, click on the appropriate one. A meter will appear; when the meter hand is in the green portion, click it again. If you wait too long, the inflatable will pop and you'll have to redo it.
Tip: Since Emily is alone, you can send her to the waterfall or water jet for a quick and easy way to earn the gold heart.
Mouse location:

Episode 11-2
The event for this level is to build the throne. Click on the throne for Francois to start; interrupt him by clicking on the register or any item.
Mouse location:

Episode 11-3
The event for this level is to find the magazines. Locations marked below.

Mouse location:

Episode 11-4
Mouse location:

Episode 11-5
Mouse location:

 The Beach: Episode 12
Jenny-Lee and Georgeopolos are the special couple during this episode. Treat them the same way as Emily and Patrick.
Episode 12-1
Patrick is now available as a cleaner.
Customers can now request skis. They will stand near the boat at the top left of the screen when they request them.
Mouse location:

Episode 12-2
The event for this level is to clean up the beach. The three trash cans will ask for different type of trash: food, bottles, and paper. Find what is requested, click on it, then click on the right trash can for Patrick to take it there. Locations marked below.

Mouse location:

Episode 12-3
Mouse location:

Episode 12-4
Lime is now available for grilled seafood, so pay attention to the order.
The task for this level is to find the plants. They will pop up all over the scene, in random places, and will continue to do so until 10 have been clicked.
Mouse location:

Episode 12-5
Mouse location:

 The Boutique: Episode 13
Episode 13-1
Customers can now request makeup.
There is a four person dressing room now.
Freddy is available to sew the clothes now.
Mouse location:

Episode 13-2
Lipstick is now available. Click on the lipstick and the meter will spin around the four colors. Click on it again when it is on the correct color.

Mouse location:

Episode 13-3
The event is to build the stage. Keep sending Emily back to it between customers.
Nail polish is prepared like the lipstick.

Mouse location:

Episode 13-4
Mouse location:

Episode 13-5
The event for this level is to sell the special fashions. Audience members will request one; click on it to put it on the tray, then click on the purchaser.
Note: You'll not get a combo bonus for including the audience's requests in a chain.
Mouse location:


Episode 14-1
Mouse location:

Episode 14-2
Mouse location:

Episode 14-3
The event for this level is to answer the phone. Be warned: it takes up a lot of time!
Mouse location:

Episode 14-4
The event for this level is to find the phone pieces. Locations marked below.

Mouse location:

Episode 14-5
Mouse location:


Episode 15-1
Mouse location:

Episode 15-2
Customers may now request just two scoops of ice cream, so pay close attention.
Mouse location:

Episode 15-3
The event for this level is to make the props.
Mouse location:

Episode 15-4
Mouse location:

Episode 15-5
The event occurs after the level, when Josh and Francois sword fight. The colored buttons will light up in the order that you need to press them. Memorize it, then repeat it. You will get another chance if you mess up.

Mouse location:


Episode 16-1
Mouse location:

Episode 16-2
The event for this level is to find Jayden. He will pop up in a variety of locations around the scene, and continue to do so until he is found ten times.
Mouse location:

Episode 16-3
Mouse location:

Episode 16-4
Mouse location:

Episode 16-5
The event for this level is to find the 16 balls. Locations marked below.

Mouse location:


Episode 17-1
The event for this level is to receive the packages.
Mouse location:

Episode 17-2
The event for this level is to swordfight again. Memorize the order of the moves, as before.
Mouse location:

Episode 17-3
The event for this level is to take photos. An exclamation point will appear over Angela's head; click on her to take a photo.

Mouse location:

Episode 17-4
Mouse location:

Episode 17-5
Tip: Don't worry if you can't reach expert before the end of the level. The event occurs after the level and will most likely give you enough points to achieve expert score.
The event is to dance; it is the same mini game as the sword fighting.
There is no entertainer for this level.
Mouse location:


Episode 18-1
Necklaces can now be made from three different pieces.
Mouse location:

Episode 18-2
The event for this level is to fit the suit. Click on Angela and Brad will go to be fitted. Send him back in between customers.
Mouse location:

Episode 18-3
Mouse location:

Episode 18-4
Mouse location:

Episode 18-5
The task for this level is to shoo away the seagulls. Locations below:

Mouse location:


Episode 11-5
Mouse location:


Jenny-Lee and Georgeopolos are the special couple during this episode. Treat them the same way as Emily and Patrick.
Episode 12-1
Patrick is now available as a cleaner.
Customers can now request skis. They will stand near the boat at the top left of the screen when they request them.
Mouse location:

Episode 12-2
The event for this level is to clean up the beach. The three trash cans will ask for different type of trash: food, bottles, and paper. Find what is requested, click on it, then click on the right trash can for Patrick to take it there. Locations marked below.

Mouse location:

Episode 12-3
Mouse location:

Episode 12-4
Lime is now available for grilled seafood, so pay attention to the order.
The task for this level is to find the plants. They will pop up all over the scene, in random places, and will continue to do so until 10 have been clicked.
Mouse location:

Episode 12-5
Mouse location:


Episode 13-1
Customers can now request makeup.
There is a four person dressing room now.
Freddy is available to sew the clothes now.
Mouse location:

Episode 13-2
Lipstick is now available. Click on the lipstick and the meter will spin around the four colors. Click on it again when it is on the correct color.

Mouse location:

Episode 13-3
The event is to build the stage. Keep sending Emily back to it between customers.
Nail polish is prepared like the lipstick.

Mouse location:

Episode 13-4
Mouse location:

Episode 13-5
The event for this level is to sell the special fashions. Audience members will request one; click on it to put it on the tray, then click on the purchaser.
Note: You'll not get a combo bonus for including the audience's requests in a chain.
Mouse location:


The Spa: Episode 14
Episode 14-1
Mouse location:

Episode 14-2
Mouse location:

Episode 14-3
The event for this level is to answer the phone. Be warned: it takes up a lot of time!
Mouse location:

Episode 14-4
The event for this level is to find the phone pieces. Locations marked below.

Mouse location:

Episode 14-5
Mouse location:


The Pool Deck: Episode 15
Episode 15-1
Mouse location:

Episode 15-2
Customers may now request just two scoops of ice cream, so pay close attention.
Mouse location:

Episode 15-3
The event for this level is to make the props.
Mouse location:

Episode 15-4
Mouse location:

Episode 15-5
The event occurs after the level, when Josh and Francois sword fight. The colored buttons will light up in the order that you need to press them. Memorize it, then repeat it. You will get another chance if you mess up.

Mouse location:


The Kid's Club: Episode 16
Episode 16-1
Mouse location:

Episode 16-2
The event for this level is to find Jayden. He will pop up in a variety of locations around the scene, and continue to do so until he is found ten times.
Mouse location:

Episode 16-3
Mouse location:

Episode 16-4
Mouse location:

Episode 16-5
The event for this level is to find the 16 balls. Locations marked below.

Mouse location:


The Piano Lounge: Episode 17
Episode 17-1
The event for this level is to receive the packages.
Mouse location:

Episode 17-2
The event for this level is to swordfight again. Memorize the order of the moves, as before.
Mouse location:

Episode 17-3
The event for this level is to take photos. An exclamation point will appear over Angela's head; click on her to take a photo.

Mouse location:

Episode 17-4
Mouse location:

Episode 17-5
Tip: Don't worry if you can't reach expert before the end of the level. The event occurs after the level and will most likely give you enough points to achieve expert score.
The event is to dance; it is the same mini game as the sword fighting.
There is no entertainer for this level.
Mouse location:


The Beach: Episode 18
Necklaces can now be made from three different pieces.
Mouse location:

Episode 18-2
The event for this level is to fit the suit. Click on Angela and Brad will go to be fitted. Send him back in between customers.
Mouse location:

Episode 18-3
Mouse location:

Episode 18-4
Mouse location:

Episode 18-5
The task for this level is to shoo away the seagulls. Locations below:

Mouse location:

The best walkthrough. Thank you.
ReplyDeleteYou are welcome, and thank YOU!
DeleteHere in 2023 and this is still the best walkthrough. You are my go-to! Thanks!
DeleteThank you so much! I made the first walkthrough because I had trouble with a certain level and needed to remember where that darn mouse was -- I never thought it would be helpful for others. I'm just so glad it is!
DeleteYou don't include the bonus levels :(
ReplyDeleteThe bonus levels are "the Beach" which is episode 18-1 through 18-5, which are just above these comments.
DeleteAfter those levels there are 2 further levels based in Emily's shop. Emily is heavily pregnant and you have to send her to the tables to collect further gold hearts. I was struggling to find the mouse in the 1st level, but have since completed it.
DeleteAre you playing on an iPad or the like? That sounds like something they've added recently. It's not on the original PC version. Sorry I could't help, but glad you found it!
DeleteHello? You found it? SHARE
DeleteFound what? Are you looking for info on the two additional bonus levels? They are apparently on the iPad version -- I'm guessing -- because they are not on the original PC version, so I'm afraid I can't help!
DeleteThe two bonus levels are also on Android. Still haven't found the mouse in the first level but I'll try again.
DeleteIt is behind the right wall, next to the top table.
DeleteOmg i was just thinking about that I I haven't replied when i found it. Just 3 days ago. I guess you came first 😂
Deletewhat to do with Emily in Bonus Level 19-1 in Honeymoon. She's pregnant and sitting in the chair.
ReplyDeleteYou need to serve her just like you did when she and Patrick were on the ship. Click on her, and then on a table so she'll go and order.
DeleteI have played the entire game and the only thing I am missing is several of the "memorable moments". I have replayed each of those levels several times, collecting the golden hearts, 3 stars and the mouse and the "moment" never appears. Any tips?
ReplyDeleteEach level requires a certain number of golden hearts to make the moment show, with the amount going up as you play through the game. The more you serve them, the more hearts you earn. If you aren't getting enough hearts, you will need to send the special couple to the table to order more frequently than you are doing. Does that make any sense?
DeleteSo you know where the mouse is in episodes 19-1 and 19-2?
ReplyDeleteThe PC game ends at episode 18.
DeleteI have the PC game (on my laptop, so Windows 10) and I can see the 2 extra levels 19-1 & 19-2
DeleteOnce you've gotten the Golden Heart, the special couple (like Patrick and Emily throughout most of the game) will not want to do anything else.
ReplyDeleteHi, I just wanted to say a BIG Thank You, I ignore all the other sites, yours is by far the best. Evelyn P. - N.C.
ReplyDeleteOh! Thank you so much! I'm just glad it is useful!
DeleteI totally agree. Yours is the best :)
DeleteSo I am stuck on episode 7-4. My level has a magic hat on the stage which Emily goes to during the game. I have completed the level but it won’t let me end the episode.
ReplyDeleteThat's odd! It sounds like some sort of a glitch, though, doesn't it. Are you using PC or mobile? If mobile, I'd check with support for sure. I wish I could help!
DeleteFor some reason I don't have enough coins to buy the last two items in the Piano Lounge. I've found all the mice, got expert level on everything but I'm short coins. And, you can't go back and replay episodes to get more coin. Is there a trick to this?
ReplyDeleteAre you playing the mobile version? In the PC version, you can go back and replay levels as much as you like. I found that you need to have earned the expert score to have enough for all the purchases, but again, that was in the PC version. I've never played the mobile version, so I'm afraid I can't help! So sorry!
DeleteThe secret mini-game
ReplyDeleteHave you discovered the secret mini-game in Delicious – Emily’s Honeymoon Cruise yet? If not, you should check it out right away, it’s great fun! Go to the main screen of the game, first click on Patrick, then on Emily and then on the logo of the game. Try to collect as many coins as you can but watch out for the evil giant fish!
No I hadn't seen that -- how fun! Is it on the mobile version, or the PC one?
DeleteOlá, amigo! <3
ReplyDeleteAcabei de começar a jogar esse jogo. Terminei o nível 1 apenas, mas já estou gostando.
Existe uma mecânica nova de corações dourados, memórias e colecionáveis de personagens que é novo para mim, então estou tentando entender.
É impressionante como Delicious é uma franquia incrível, com tantos jogos divertidos, personagens e histórias cativantes. Mesmo que atualmente os jogos deles estejam com um design e mecânicas que não são tão legais quanto os antigos, é incomparável como um jogo Delicious atual, que foi mudado para se parecer com o Primrose Lake, é melhor que o próprio PL e outros jogos parecidos.
Será que somos saudosistas? Sei lá, eu realmente acho que os jogos recentes da Delicious estilo PL são menos legais, bonitos, criativos e divertidos que os antigos.
Só sei que estou gostando do cruzeiro, estou entendendo porque é um dos seus favoritos <3
I hope you find it as fun as I do!
DeleteQueria um conselho. Você acha melhor eu ir acumulando dinheiro para comprar as melhorias/upgrades depois ou você recomendar eu comprar as melhorias/upgrades enquanto estou no inicio?
DeleteI always wait until the second restaurant to start buying upgrades. I found that I could make it through the Pool Deck: Episode 1 without needing any, then bought a few for The Boutique: Episode 2 right away. I only bought a few each location, each time, so that I'd have some money for the next location. You'll return to the locations a few times throughout the game, so you'll be able to upgrade more as you play.
DeleteAh, legal! Eu também sempre faço isso. Nesses jogos, eu sempre jogo o primeiro episódio sem comprar nenhum ou pouco upgrades para ter dinheiro nos capítulos seguintes.
DeleteÉ que como são capítulos curtos, mesmo sabendo que irei voltar nas mesmas lojas, queria saber se você fazia a mesma coisa que eu.
Eu estou na Boutique e com dinheiro sobrando. Legal ver que a Ângela começa a trabalhar com moda nesse jogo... para depois ela ser traída pelo marido :(
Obrigado, amigo! <3
I really hated the story line where Angela's husband betrayed her. I pretend that the Angela fashion stories are about somebody else. They don't keep to Emily's history, so it's easy to do. 😆
DeletePois é, amigo. Ele é uma pessoa muitas vezes arrogante que só pensa em si, mas ele tem camadas, uma complexidade. Os personagens da Delicious são incríveis e realistas. Tipo, não é só porque o Jimmy é muitas vezes babaca que necessariamente seria capaz de trair, até porque a construção de personagens dele ao longo dos jogos da Emily demonstra que ele realmente ama a Ângela. Loucura! Mas fazer o quê, é só fingir que que é outra história.
DeleteAliás, amigo, eu estou o cruzeiro. Meu deus, que jogo divertido! É tão legal jogar com os personagens da franquia. Queria saber quais foram seus restaurantes favoritos. Poderia colocá-los num ranking? Vou escrever aqui os lugares para ficar fácil de você copiar e colar.
- Pool Deck
- Boutique
- Spa
- Piano Lounge
- Kid's Club
- Beach
Eu não joguei em todas as lojas, então quando tiver o feito, eu ranqueio as posições.
The Kid's Club is my favorite! Then Spa, Boutique, Pool Deck, Beach, and Piano Lounge. To me, this is just such a fun game all around!
DeleteOlá, amigo <3
DeleteNossa, que engraçado, o meu favorito é o que você colocou em último kkkk
1 Piano Lounge
2 Pool Deck
3 Kid's Club
4 Spa
5 Boutique
6 Beach
Sabe, agora entendi o porquê desse jogo ser um dos seus favoritos... agora ele também se tornou um dos meus.
O cruzeiro é super divertido. Ainda não terminei o jogo, mas estou amando. Nossa, ver a Angela começando seu sonho, poder jogar com personagens diferentes.
Aliás, poderia me ajudar em uma coisa? Eu comprei a melhoria do perfume, porém, não sei usar. Quando eu uso o perfume, não parece aumentar o dinheiro que os cliente me pagam. O que eu faço? Preciso usar num momento certo?
That's funny how different our favorite levels are! But I'm so glad you're liking it too!
DeleteThe perfume is supposed to increase tips, but it's always hard for me to tell exactly how much tip I am getting, so I don't know how well it works. I've always had trouble with it too!
Bom, terminei a boutique e não aprendi a usar o perfume...
DeleteEstou quase no fim do jogo, amigo. Estou tão triste, esse jogo é MUITO BOM. De verdade, ele também se tornou um dos meus favoritos, talvez esteja acima do Wonder Wedding.
O próximo é o New Beginning, né?
Sim, amigo, é divertido ver nossas diferenças ε(´。•᎑•`)っ 💕 . O que fez o Lunge ser meu favorito foi porque eu adoro cozinhar e ter meu restaurante, as combinações dos pratos e os tipos de doces que tem, além de que eu amei jogar com os pais da Emily. Aliás, eu baixei o Pool Deck de rank, agora o Kid's Club está em segundo
O que você mais gostou do Kid's Club que o fez seu favorito?
This one is definitely my favorite! I love all the locations!
DeleteKid's Club is my favorite because it's so colorful and the toys and puppets are such fun.
Yes, New Beginnings is next. I really like it, too, but more for the story than for the restaurants. There is one restaurant that I didn't really enjoy. But, the game is still so good, and the story is great fun.
Sério? Qual restaurante que você não gostou do New Beginning?
DeleteBom, geralmente tem jogos da Delicious que os restaurantes não são tão divertidos ou interessantes, mas mesmos esses são mais legais que os jogos atuais que tentam copiar a franquia e fazem algo bem genérico kkkk
Eu tenho uma assinatura na Zylom. Vi você dizendo que não joga alguns porque não possui mais assinatura na GameHouse. Você só joga originais ou também piratas?
Obrigada, amigo, pela ajuda <3
I am so sorry I missed this! I'm not crazy about the two restaurants that Wu has, but I still just love the game!
DeleteI own the games from long, long ago, and transfer them over each time I have to get a new laptop. This series has always been my favorite!
Episode 19 1 the mouse is behind the flowers in the middle of the room and 19 2 it's by the end of the bar with the 2 stools up by the door
ReplyDeleteOn the PC version, it only goes through episode 18. Are you playing on iPhone or the like? Hopefully you can find a walk through that includes those episodes if so. :)
DeleteOn the Gamehouse Platinum Edition for PC, there actually is a level 19. You can get it with their FunPass.
DeleteHi. Your friendly neighborhood proofreader again. :D I just noticed that Episode 13-1 is accidentally posted as Episode 12-5.
ReplyDeleteThanks! (That happens when you copy/paste and aren't careful!)
DeleteAnytime :)
DeleteJust a spoiler, of sorts. In the opening scene of Episode 18-1, you can see Emily is pregnant. She's holding her baby bump.
ReplyDelete