
Note: I only play games on the PC, so I may not be able to help with other platforms.
 |
Basics:
Delicious: Emily's Childhood Memories is one of the "Delicious" series of time management game. A customer's order will appear in a thought balloon over his head, and you play (mostly) as Emily, serving the customer by preparing the food. For most items, this simply requires clicking on the corresponding food; other food may require several steps. This game contains an excellent basic tutorial before the first level; if you've not played one of the Delicious games before, I recommend you play it.
Tip: This game can be slow to load levels. Don't panic, thinking that it's frozen; just give it a little more time than you would usually allow.
Customers order food and pay for it. When a customer is waiting to pay you will see an image of bills and coins; the coins represent the tip. The higher the customer happiness, the greater the tip. Unfortunately, the customers don't have happiness levels shown by hearts next to them as many other games do, so you have to pay attention to customer facial expressions to know how they are feeling. You will know if a customer has maximum happiness (is ecstatic) because there will be a heart next to his head. If a customer is angry, his face becomes red. If he becomes furious it is shown by a storm cloud; a furious customer needs to be served immediately or he will leave and you will be penalized -50.
When a customer arrives at the counter to pay, a thought bubble will show a stack of money and a stack of coins. The coins are the tip amount; as a customer decreases in happiness the tip amount will decrease as well.
Here are examples of customers:
 |
| Ecstatic customer |
 |
| Ecstatic customer's tip. |
 |
| Angry customers. |
 |
| Angry customer gives no tip. |
 |
| Furious customer |
As you play, you will get to know your customers and their level of patience. The overweight customers (know as "Foodies") and the Senior customers have the most patience and can be made to wait so you can make combos. Kids have the least patience.
Doing the same action twice or three times in a row (chaining) will help you achieve higher scores.
Chains can be earned by having two or three orders prepared on your tray, and serving them to the customers without an interruption* to do another task. Serving two customers gets you the "2 in a row" bonus of +11, while serving three customers gets the "3 in a row" bonus of +16. Chaining can also occur when using the cash register. When you check out two customers at the same time, you get a "2 Combo" for +10, three customers together give a "3 Combo' bonus of +20. Note that this is not two customers in a row, but rather at the same time. When customers are ready to pay, they will stand at the counter; wait until you have two or three waiting to pay and one click of the cash register will take care of them all at once.
*Serving customer orders can be interrupted by using the cash register, and the chain will not be broken.
Tip: Plan to serve complete orders only, as doing this will give you a bonus of +5 for a table of one, two or three customers, +10 for a table of four.
Certain days have events, which are tasks that need to be performed. If there are multiple parts to the task, a +25 will be added for each completed part. The fully completed event will give a +100 to your score. If you don't complete the task, the level can still be won.
 The mouse will appear in each level. He appears for a few seconds, and you'll know he is there by the chittery-mousy sound that happens each time he shows up. (Sometimes you can see the mouse hole in the scene.) You will be rewarded +100 for clicking on him. If you don't find him right away, he will continue to come back until the end of the level. You will earn a trophy for finding him in every level. A screenshot has been provided for each level to show the mouse location.
Decoration money is earned for completing the level, with an additional amount earned for achieving expert. This money is used to by upgrades, with different items for each restaurant. You will earn a trophy for buying all the decorations.
Tip: The first restaurant can be successfully completed without upgrades, so if you wish you can save up your money and be able to buy all the upgrades for the second restaurant at the first level.
Tip: The first restaurant can be successfully completed without upgrades, so if you wish you can save up your money and be able to buy all the upgrades for the second restaurant at the first level.
Entertainers becomes available eventually in each restaurant. To use an entertainer, click on the entertainer and then the table you want the entertainer to visit. The entertainer will entertain for a few seconds and then that table will gain a heart; you will hear a particular sound that signals that happiness has been gained. Using an entertainer will not prevent a customer from loosing a heart.
Tip: Using an entertainer is especially helpful when you have a table waiting at the cash register so that you can have two or three tables pay at the same time for the bonus.
 |
| Memory |
There are 25 Memories to be collected. These happen in the story scenes before the game levels. A camera will appear and you simply click on the camera to capture the moment. You can view them in the scrapbook. You will receive a trophy for collecting all the memories.
Memories are located in the following levels:
The
Farm, Day 1;
The
Farm, Day 3;
The
Farm, Day 5;
The
Farm, Day 6;
The
Farm, Day 9;
The
Garden, Day 1;
The
Garden, Day 3;
The
Garden, Day 6;
The
Garden, Day 7;
The
Garden, Day 10;
The
Campsite, Day 1;
The
Campsite, Day 2;
The
Campsite, Day 5;
The
Campsite, Day 9;
The
Campsite, Day 10;
The
Restaurant, Day 3
The
Restaurant, Day 5;
The
Restaurant, Day 6;
The
Restaurant, Day 7;
The
Restaurant, Day 10;
The
Farm (Part Two), Day 1;
The
Farm (Part Two), Day 4;
The
Farm (Part Two), Day 6;
The
Farm (Part Two), Day 9;
The
Farm (Part Two), Day 10.
Ten GameHouse Items are hidden throughout the game. You can find them in the these levels:
The Farm, Day 4; The Farm, Day 8; The Garden, Day Two; The Garden, Day 8; The Campground, Day 4; The Campsite, Day 8; The Restaurant, Day 2; The Restaurant, Day 6; The Farm (Part Two), Day 4; The Farm (Part Two), Day 8. A screenshot will show the location in the walkthrough below.

Trophies
Note: Some trophies are only available on the Premium version.Most of these trophies will be earned simply by playing through the game, but here are tips on a few.
The Decoration Burst: You will not earn enough money to buy all the decorations until you finish the final level. At that point, go back to whatever restaurant still has items for purchase and finish your decorating.
The Spill: Create 120 pourable items without spilling. After the game was finished, I went back and played the Farm, Day 4 to complete this one.
The We're-Having-a-BLAST: Entertained a customer to the point of feeling ecstatic 150 time. To earn this, when your customer first sits down, send the entertainer to raise the level to ecstatic before serving the food. Begin by entertaining each customer as soon as you have an entertainer and you'll earn this by the middle of the game.
Tip: On the beginner setting, the customers arrive feeling ecstatic, so you would have to wait until their happiness level dropped before you could raise it to ecstatic again. As a result, I think it would be very hard to earn this trophy on beginner.
The Taste Explosion: for tips on this trophy, see The Campsite, Day 7.
The Stocker Rocket: for tips on this trophy, see The Garden, Day 6.

The Farm
Tip: You can easily earn expert for each level without the bonuses from decorations, so you might want to save your decoration money for the next restaurant. If you do that, you will be able to buy all the decorations at the beginning of the restaurant. (You will be able to go back to the restaurant after the game is over and buy the decorations so that you can earn the trophy.)
Note: If you purchase the ostrich upgrade, you will have an ostrich that lays eggs in addition to the hen. Customers will then order omelettes made from one or the other. You can tell which is which by size, with the ostrich being the large egg.

The Farm, Day 1
At the farm, you will play as Edward. In the first few levels, you'll need to clean the tables as well as serve and take payments. To clean tables, just click on the dirty table and Edward will clean it. Customers won't sit at a dirty table, so you will need to keep them clean to get more customers.
Tip: You don't have to wait until the customers have left to clean a table. An exclamation point will appear over the table when a customer goes to check out, leaving the others at the table. As soon as the exclamation point appears, you can clean the tables--even if there are still customers seated at the table.
To build the sandwich, click on each individual piece.
Mouse location:

The Farm, Day 2
Emily will now clean the tables.
A chicken will roam the restaurant and lay eggs; you will know she is about to lay one because she will cluck. Click on the egg and Emily will pick it up. You can store a maximum of 8 eggs at a time.
To cook eggs, click on the egg and it will begin to fry in the pan. Keep an eye on your frying eggs, as they will burn if you don't get them out in time. There will be a sizzling sound when the egg is finished. After the egg is fried, click on the ingredient that is to be added.
Mouse location:

The Farm, Day 3
In this level you help Emily learn to ride her bike. She will leave Edward's side, get on the bike and wait for him to give her a push. This will happen five times, then you will have a memory to capture.
You have a larger tray today, enabling you to make serving chains.
Mouse location:

The Farm, Day 4
This level introduces "pourable" food. To pour the honey, click on the beehive and when the meter is in the green, click on it again. If you click on the honey while the meter is in the red, you will spill the honey. You'll want to pay attention to your pourable food, as you can get a trophy for pouring 120 without spilling ("the Spill").
This is the first level to have a hidden Gamehouse object. By collecting all ten of them, you will earn a trophy (location shown in screenshot below).
Mouse location; Gamehouse object location:

The Farm, Day 5
A second item can now be combined with eggs, so pay attention to your orders.
You have a special task to complete today: collect daisies for Grandpa. The locations are shown on the screenshot below.
Mouse location; daisy location:

The Farm, Day 6
You now have the rabbit, Snuggles, as an entertainer. To entertain your customers, first click on the rabbit and then on the table you wish to entertain. Once the rabbit is finished entertaining, the customers at that table will gain +1 happiness. Having customers begin as ecstatic makes it easier for them to wait, making it possible for you to plan for three customers in a row to checkout, thus earning the bonus.(If you wish to earn the trophy for entertaining a customer to the point of feeling ecstatic 150 times, "the We're-Having-a-BLAST" trophy, it is a good policy to begin entertaining each table now.)
Sandwiches have a fourth ingredient option now, so pay close attention to the order. Sandwich varieties pictured below:

Mouse location:

The Farm, Day 7

In this level, you have to help Hunter find his puppy. There are several spots in the restaurant which will show up as a magnifying glass when you mouse over them. These are spots that you can search in; see example to left. Click on these spots and Emily will walk there and search for Hunter's puppy.
You now have a new table located on the porch.
Mouse location; puppy location:

The Farm, Day 8

Your task today is to share Grandma's cookies with the customers. Customers will not ask for the cookies, so you can serve them to whichever customer you wish. To do this, click on the cookies and one will appear on your tray; the next customer whose order you serve will receive the cookie. This will raise the customer's happiness to beyond ecstatic (shown by three hearts) and keep it there.
Tip: Use the cookies on counter customers so that you can keep them waiting at the counter until you can make a chain of three paying customers.
A Gamehouse object is hidden on this level, as well.
Mouse location, cookie location, Gamhouse object location:

The Farm, Day 9
You play as Madeline, Emily's grandmother, on this level. Gameplay is the same.
Your task on this day is to put up the decorations. To do this, click on the decoration (locations shown below) and continue to click until you reach 100%. You can interrupt the clicking to do other things in the restaurant. It is a tedious task which takes a long time, and you'll have to do it more throughout the game, but happily the developers realized that it was a terrible mini-game and the fast-clicking task doesn't appear in any of the other "Delicious" games.
Mouse location, decoration locations:

The Farm, Day 10
Your task today is to keep baby Angela happy. There is a meter over her head that slowly runs down. Click on Angela to send Emily to dance for her. This will cause to meter to fill up again. You will need to do this several times over the course of the day.

Mouse location:


The Garden
Tip: Buy the scarecrow first off, as it will give +2 for each customer, making it easier to achieve expert on each level.
The Garden, Day 1
In the farm, you will need to pick fruit to restock it. Watermelon is introduced in this level. Simply click one of the watermelons for Emily to pick it. Each watermelon gives four slices; you can stock a maximum of eight slices.
Emily will have to clean the tables herself on this level.
Your task for this level is to clean the drawings off the wall (see screenshot below for the six locations). It is another one of the annoying click-for-a-long-time tasks.
Mouse location, task locations:

The Garden, Day Two
There are now strawberries to pick, located on the bush in the upper left of the garden. You can stock up to eight.
There is a Gamehouse object on this level; see below for location.
Uncle Antonio will clean the tables from this level until the end of the garden.
Mouse location, Gamehouse object location:

The Garden, Day 3
Oranges are introduced on the left hand tree. You can stack up to eight.
Tip: If you've not yet purchased the woodpecker, now is a good time--he will knock off the oranges, saving Emily from having to do it.
Your task this level is to find the ten bats for Francois; locations marked below.
Mouse location, bat locations:

The Garden, Day 4
Now you can make fruit pies. Click on the pie crust, then the fruit. The oven will ding when the pie is ready; it will burn if you wait too long.

Mouse location:

The Garden, Day 5
In this level, your task is to find the eight rabbits; locations circled in the screenshot below.
Jam is introduced in this level. It is prepared the same way as a pie: click the jar first, then the fruit.

Mouse location, rabbit locations:

The Garden, Day 6
Pears are introduced in this level, in the right hand tree.
Tip: This is the level to earn the trophy (the Stocker Rocket) for having the maximum (8 pieces) of all fruit in stock.
You know have Francois to entertain customers. Be sure to utilize him to bring customers to ecstatic when they first sit down, which will help to earn the entertainer trophy.
Mouse location:

The Garden, Day 7
Your task today is to make cookies. Click on the table and Emily will sit down and work with Grandma. You can interrupt this task by clicking on any menu item.
Mouse location:

The Garden, Day 8
This level contains a Gamehouse object; location shown below.
Mouse location, Gamehouse object location:

The Garden, Day 9
Your task for this level is to find Angela. Mouse over various locations in the garden and you'll see a magnifying glass; click to have Emily look there. Angela's location is marked on the screenshot.
Mouse location, Angela location:

The Garden, Day 10
Your task this level is to catch four fireflies. They will appear one at a time over the course of the level. They flit, but are easy to catch. The motion of them will most likely catch your eye.

Mouse location:


The Campground
Note about the Campground: I don't know if it is a glitch in the game or intentional, but if you have a DJ, when a record is playing Emily can't add anything to her tray.
The Campground, Day One
Emily will have to clean the tables today.
Sandwiches require two pieces of bread, so don't forget to click the bread slice again after the cheese.
Your task is to give the baseball back, when Hunter's friend comes asking for it. The ball will appear in these four locations, in any order.
Location One:

Location Two:

Location Three:

Location Four:

Mouse location:

The Campground, Day Two
Emily still has to clean the tables today.
Customers can now come to the dance floor and request one of the three records. If you buy the DJ upgrade in the shop, then Emily won't have to walk over to the records. You can get a two-in-a-row bonus if you click the record with a tray already loaded.
Mouse location:

The Campground, Day 3
Emily has to clean tables again today.
The task today is to clean up the messes; it's the clicking task again. (Location of messes shown in screenshot below).
You now have sausages to cook over the fire. Be sure and pay attention to them, as they will burn.
Mouse location, mess locations:

The Campground, Day 4
Stacy will clean the tables now and for the rest of the Campground levels.
Sandwiches has an additional possible ingredient, so pay attention to the orders.
To restock camping items, click on the cardboard box.
There is a Gamehouse object hidden in the level, shown in screenshot below.
Mouse location, Gamehouse object location:

The Campground, Day 5
Today's task is to find Emily's diary. You'll see a magnifying glass when you mouse over parts of the campground. Click on that location to have Emily search it. The location of the diary is marked on the screenshot below.
You now have three items that can be cooked on the campfire. You can have three cooking at once.
Mouse location, diary location:

The Campground, Day 6
Angela is now available as an entertainer. Customers on the stools can also be entertained.
Frozen yogurt is now on the menu and is prepared the same way as the honey in the Farm levels: click on the correct flavor and click again when the meter is in the green. Frozen yogurt counts as a "pourable" towards "the Spill" trophy.
Mouse location:

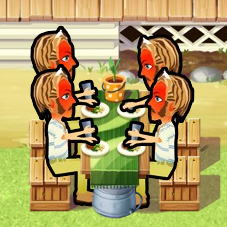
The Campsite, Day 7
Tip: This is the level to achieve "the Taste Explosion" trophy; put four possible variants of a product on your tray as shown below.

Your task on this level is to catch the spiders. Your eye should be caught by the motion of the spider, so that you will notice it. If you wait too long, the spider will disappear again. They will appear in these five locations, in any order.
Location One:

Location Two:

Location Three:

Location Four:

Location Five:

Mouse location:

The Campsite, Day 8
The task for this level is let Francois fix Emily's make-up. Click on Francois in between tasks until the meter fills.

There is also a Gamehouse object in this level; see below.
Mouse location, Gamehouse object location:

The Campground, Day 9
The task for this day is to find the eight hidden soda cans. Locations are marked below.
Mouse location, soda locations:

The Campground, Day 10
You will have to feed the party in this level. Including items for the party in a chain will not give you the chain bonus. Serve them all their orders before the meter runs out.
There are no tables available for customers, only the stools.
Emily will have to clean the tables today.
Tip: If you have been entertaining regularly, bringing the seated customers up to ecstatic before delivering their food, then you will receive the "We're-Having-a-BLAST" trophy in this level.
Mouse location:


The Restaurant
Note: Antonio's Restaurant is only available in the "Premium" version of the game. In the standard version, this location doesn't appear at all, some of the story line is missing, and the second Farm location is called "the Restaurant".
Tip: There are only two spots for customers to stand in line to pay. If a customer gets in line behind someone, and the other side frees up, the customer will sometimes still stays in the line they are in, waiting. This can cause customers to get angry with waiting, so pay close attention to who is in line.
Tip: Purchase the wall decorations early, as it will give +2 bonus for each customers.
The Restaurant, Day One
Emily will have to clean the tables today.
To make pasta dishes, first click on the type of pasta, then on the type of sauce.
The task for this day is to find the dropped items. They are not hidden in the level, but appear when the customer comes to the door to ask for them. Locations shown below.
Phone:

Wallet:

Key:

Mouse location:

The Restaurant, Day 2
Francois is available to clean tables now.
To restock the soup, click on the prep table beside the stove. Only four bowls can be stocked at a time. If you purchase Uncle Antonio in the shop, he will stock the soup for Emily when one completely runs out or when you click on the prep table.
There is a Gamehouse object in this level.
Mouse location, Gamehouse object location:

The Restaurant, Day Three
To make juice, first click on the bottle and then on the fruit.

This day's task is to find the dropped cookies. Locations shown below.

Mouse location:

The Restaurant, Day 4
Pizza can now be ordered. To prepare it, click first on the crust, then on the topping. The oven will ding when the pizza is ready. It will burn if you take too long.
Mouse location:

The Restaurant, Day 5
There are now two juice options and a choice of four pizza toppings.
Your task for this level is to talk to Angela, and keep the meter from emptying. Click on Angela for Emily to go and talk to her, raising the meter to full. You'll need to do this several times throughout the day. It doesn't take long, and clicking while waiting for a customer to order seems to work well.
Tip: This task will earn +300 at the end of the level; if it seems that you are having a hard time reaching expert, remember that you can count on that bonus.

Mouse location:

The Restaurant, Day 6
Edward will now be available to entertain guests.
A second soup bowl has been added. While it is a slightly different color, it looks a lot like the other bowl of soup, so you'll have to depend on which way the spoon is pointing to denote a difference.

A Gamehouse object is located in this level.
Mouse location, Gamehouse object location:

The Restaurant, Day 7
The task for this level is to make cookies. Click on the cookie-making table, interrupting to click other places when needed. Continue to return to the table until the meter fills, completing the task.

Mouse location:

The Restaurant, Day 8
Your task is to find the missing recipe. You'll see a magnifying glass when you mouse over parts of the restaurant. Click on that location to have Emily search it. The location of the recipe is shown on the screenshot below.
Mouse location, recipe location:

The Restaurant, Day 9
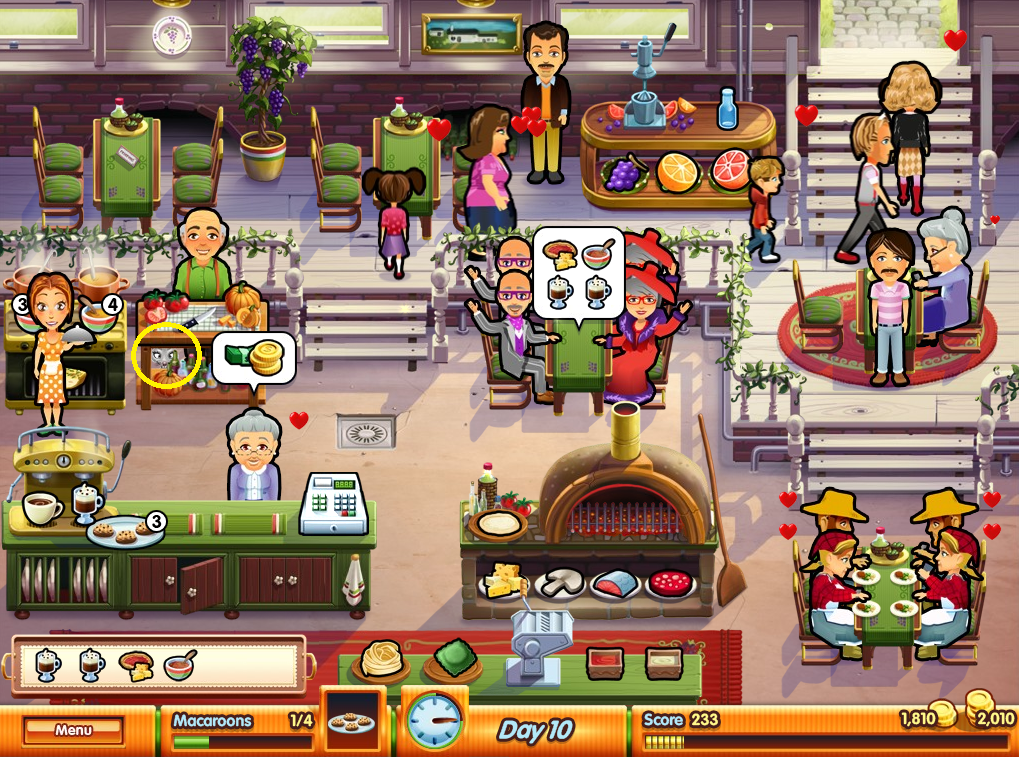
You will have to feed the summit in this level. Including items for the summit in a chain will not give you the chain bonus. Serve them all their orders before the meter runs out.
Mouse location:

The Restaurant, Day 10
Your task today is to share the cookies with the customers. Customers will not ask for the cookies, so you can serve them to whichever customer you wish. To do this, click on the cookies and one will appear on your tray; the next customer whose order you serve will receive the cookie. This will raise the customer's happiness to beyond ecstatic (shown by three hearts) and keep it there.
Mouse location:

The Farm, Part Two
If you are playing the regular version (as opposed to the Premium version), these levels will be called "the restaurant".
Tip: Buy the "Inviting Friends" upgrade early on. This occasionally brings old friends from the previous two games as customers. They stay patient regardless, and always give the maximum tip.
Note: In this restaurant, you'll be serving pancakes. Uncle Antonio will make a stack of eight pancakes when you click on him. To serve a pancake, click on the pancake stack until you have the desired number of pancakes--they will be show up on the plate next to the stack. Click the plate with your pancakes to add it to your tray, You can click on the Antonio at any time, you don't have to wait until all the pancakes are gone.

The Farm, Day One
Emily has to clean her own tables today.
To restock the juice bottles, click on the cardboard box.
Note: The pink grapefruit juice and orange juice pictures can look very similar, especially when they are not pictured side by side.

Today's task is to spray the rose bush. Click on the bush and Emily will spray it until you click on another task. Keep sending her back to the bush in between customers until the task is finished.

Mouse location:

The Farm, Day Two
Angela will clean tables from now on.
You now have soup with a choice of sides. Click first the soup bowl, then the second item.
Tip: Buy the soup kettle upgrade for today, as it will give a plus +2 for each soup customer.
Mouse location:

The Farm, Day 3
Your task today is to share the pizzas with the customers. Customers will not ask for pizza, so you can serve them to whichever customer you wish. To do this, click on the pizzas and one will appear on your tray; the next customer whose order you serve will receive it. This will raise the customer's happiness to beyond ecstatic (shown by three hearts) and keep it there.
Mouse:

The Farm, Day Four
Your task for this level is to repair on the table. Click on the table and Emily will go to repair it. Interrupt her to do other tasks, and then return to it until it is repaired.
Cheesecake is now available. Click on the cheesecake, then the berry.
This level contains a Gamehouse object.
Mouse location, Gamehouse object location:

The Farm, Day Five
Today's task is to clean up the four spots of dirt (see location in screenshot below). This is the final time for the keep-clicking-for-a-long-time task.
There are now two berries, and the addition of jam. Make jam like cheesecake: first click the jam jar, then the berry.
Mouse location, dirt locations:

The Farm, Day Six
Francois is available as entertainer now.
Pie can now be ordered. Click on it to put it into the oven. The oven will ding when it has baked; don't leave it too long or it will burn.
Mouse location:

The Farm, Day 7
Your task is to find the missing envelope. You'll see a magnifying glass when you mouse over parts of the yard. Click on that location to have Emily search it. The location of the envelope is shown on the screenshot below.
Mouse location, envelope location:

The Farm, Day 8
There is a Gamehouse object located on this level.
You will have to feed the factory workers in this level. Including items for them in a chain will not give you the chain bonus. Serve them all their orders before the meter runs out.
Mouse location, Gamehouse object location:

The Farm, Day 9
The task for this level is to find the daisies. Locations are marked on the screenshot below.
Mouse location, daisy locations:

The Farm, Day 10
In this level, Emily plays hide and seek with the little girl. The girl will appear in these four locations, in any order;
Location one:

Location two:

Location three:

Location four:

Mouse location:

I've been using this guide for so long, and I just wanted to thank you for this wonderful guide! <3
ReplyDeleteI am so glad it has been helpful!
DeleteThe Memory's in The Farm - Day 9 instead of Day 10 ;)
ReplyDeleteMemory in The Garden - Day 6
DeleteMemory in The Garden - Day 7
DeletePerhaps we played different versions? When I played this, I marked the memories as I went along. I appreciate your pointing this out, in case other people are playing your version, but for my version, this is correct.
DeleteAre you playing the Deluxe version with 5 locations? Or the standard with 4? I'm wondering if that would make a difference.
DeleteI'm going to replay it as I have time and double check, but I am most careful when I write these!
This comment has been removed by the author.
DeleteThis comment has been removed by the author.
DeleteRight!
DeleteI'm playing the Deluxe version. Sorry, didn't realize that!
And there's another Memory in The Restaurant - Day 3. There are 25 memories in this version, 5 for each location.
Thanks! ;)
But it is just like your screenshots...
DeleteThis walkthrough is for the deluxe edition.
DeleteI'm not sure why we're not agreeing over the memory days, but I have deleted them and as I have time will replay the game to be certain they are correct.
Hi. Just a quick note regarding the "We're Having A Blast" trophy. The requirement is 120 customers entertained instead of 150. Not a big deal, though, as it's not something hard to achieve.
DeleteThanks! I made this walkthrough in 2015 from the PC game. Sometimes they make changes/updates, especially if they are ported to ipad/mobile/etc, so it could be different on my version. Next time I replay it, I'll double check! Thanks again. :)
DeleteYou're most welcome :)
Delete