
 |
Basics:
This game has an excellent tutorial, accessed from the main menu. I recommend you to play it first if you've not played one of the Delicious games.
Customers order food and pay for it. When a customer is waiting to pay you will see an image of bills and coins; the coins represent the tip. The higher the customer happiness, the greater the tip. Unfortunately, the customers don't have happiness levels shown by hearts next to them as many other games do, so you have to pay attention to customer facial expressions to know how they are feeling. You will know if a customer has maximum happiness (is ecstatic) because there will be a heart next to his head. If a customer is angry, his face becomes red. If he becomes furious it is shown by a storm cloud; a furious customer needs to be served immediately or he will leave and you will be penalized -50. .Customers will become impatient and pay lower tips if they have to wait in line behind other customers for too long.
As you play, you will get to know your customers and their level of patience. The overweight customers (know as "Foodies") and the Senior customers have the most patience and can be made to wait so you can make combos. Kids have the least patience.
Examples of Customers:


An unhappy customer (left) and an angry customer (right).
Doing the same action twice or three times in a row (chaining) will help you achieve higher scores.
Chains can be earned by having two or three orders prepared on your tray, and serving them to the customers without an interruption* to do another task. Serving two customers gets you the "2 in a row" bonus of +11, while serving three customers gets the "3 in a row" bonus of +16. Chaining can also occur when using the cash register. When you check out two customers at the same time, you get a "2 Combo" for +10, three customers together give a "3 Combo' bonus of +20. Note that this is not two customers in a row, but rather at the same time. When customers are ready to pay, they will stand at the counter; wait until you have two or three waiting to pay and one click of the cash register will take care of them all at once.
*Serving customer orders can be interrupted by using the cash register, and the chain will not be broken.
Tip: Plan to serve complete orders only, as doing this will give you a bonus of +5 for a table of one, two or three customers, +10 for a table of four.
Certain days have events, which are tasks that need to be performed. If there are multiple parts to the task, a +25 will be added for each completed part. The fully completed event will give a +100 to your score. If you don't complete the task, the level can still be won.
 The mouse will appear in each level. He appears for a few seconds, and you'll know he is there by the chittery-mousy sound that happens each time he shows up. (Sometimes you can see the mouse hole in the scene.) You will be rewarded +100 for clicking on him. If you don't find him right away, he will continue to come back until the end of the level. You will earn a trophy for finding him in every level. A screenshot has been provided for each level to show the mouse location.
Entertainers become available eventually in each restaurant. To use an entertainer, click on the entertainer and then the table you want the entertainer to visit. The entertainer will entertain for a few seconds and then that table will gain a heart; you will hear a particular sound that signals that happiness has been gained. Using an entertainer will not prevent a customer from loosing a heart.
Tip: Using an entertainer is especially helpful when you have a table waiting at the cash register so that you can have two or three tables pay at the same time for the bonus.
Decorations: Decorations can be purchased in the shop. You earn $100 for completing the level with the target score and another $100 for completing it with an expert score. There is a different shop for each restaurant. There is a description for each decoration which will tell you what bonus is gained from it. If you have the premium edition of the game, you will have two bonus decorations per level. I advise you to save your decoration money during Emily's Place (Part 1), as you really won't need the decoration bonuses until more challenging levels. By waiting, you can save $1000, and can earn the trophy Saving for the Future.

Making Evelyn Proud: This trophy is awarded for going five consecutive days without leaving dirty tables, There appears to be some sort of glitch with this trophy, as it cannot be earned during the first restaurant (Emily's Place). However, if you keep the tables clean in the second restaurant (Carmen's Comedor), you will be able to earn it.
Let Me Entertain You: This trophy is earned for entertaining every seated customer during a day. However, it can only be earned if you increase the happiness of your customers with the entertainer. This means that if you are playing on the beginner difficulty (when all customers arrive with full happiness) you won't be able to earn this trophy.
Women's Intuition: This is for having the customer's order on your tray before they order it. The trophy says "two times in a row", but it actually means just doing it twice; it doesn't have to be for two customer's in a row. I completed this on the second level by having the two deserts and the drink on my tray and eventually I was right for two customers.
Trying for Target: If you normally achieve expert, getting this trophy can be frustrating. Here is what I did to win it: Play on the advanced setting. Don't find the mouse, as it gives +100, Don't serve full orders (serve in two trips), as full orders give a +5 bonus. Don't make combos, as they give a score bonus.
Shopping Spree: The only way to earn enough decoration money to be able to purchase all the decoration items and achieve this trophy is to finish each level on expert.
For tips on the Sweet Tooth trophy, see Emily's Place, Day 1.
For tips on the Oops I Did It Again trophy, see Emily's Place, Day 2.
For tips on the Ring the Bell trophy, see Emily's Place, Day 4.
For tips on the Let Me Entertain You trophy, see Emily's Place, Day 6.
For tips on the Serving Charcoal trophy, see Carmen's Comedor, Day 6.
For tips on the Ecstasy trophy, see Emily's Place (Emily's Return), Day 6.
For tips on the Three Variations trophy, see Emily's Place (Emily's Return), Day 7.
For tips on Saving for the Future, see the Decorations section.

Emily's Place
Emily's Place, Day 1
Emily will have to clean tables today. To do so, click on the table and she will walk to it and clean it. Customers won't sit at a dirty table, so you will need to keep them clean to get more customers.
Tip: You don't have to wait until the customers have left to clean a table. An exclamation point will appear over the table when a customer goes to check out, leaving the others at the table. As soon as the exclamation point appears, you can clean the tables--even if there are still customers seated at the table.
To make a sandwich, click on each ingredient in order.
Tip: This is a good level to get the Sweet Tooth trophy, as it's not a busy level. Fill your tray with cheesecake or cookies a total of ten times. Click on the items on your tray that you don't need to empty the tray.
Mouse location:

Emily's Place, Day 2
Your task for this level is to clean the four messes. Click on the exclamation point and Emily will walk to the mess and begin to clean it. You can interrupt the cleaning to do other tasks, then click on the mess again to return Emily to it.
Tip: Clean the table first so that it will be available for customers.
Emily will have to clean the tables again today.
Sandwiches now have a choice of three toppings, so pay close attention to the customer's order.
Tip: Since it's not very busy, this is a good level to earn the Oops I Did It Again trophy, by deleting 20 items from your tray--but you will have to win the level with expert to get the trophy.
Note: You won't get the notification for the Oops I Did It Again trophy until the level is completed.
Note: I tried to earn this trophy on the Emily's Place, Day 1, and was unable to do so.
Mouse location:

Emily's Place, Day 3
Evelyn is now available to clean tables.
There are now four topping choices for the sandwich, so you'll need to pay close attention to the customer's order.
Today's task is to read the letter. You will have to click on the letter and Emily will read part of it. You will need to do this a total for five times.
Mouse location:

Emily's Place, Day 4
Peppers are now available. They will need to be picked from the plant beside the door. To do so, click on each individual pepper. The peppers will regrow over time. You can stack up to nine peppers. To bake a pepper, click on the pepper, then the rice. It will move to the oven. Don't wait too long or the pepper will burn.
Tip: If you have purchased the pepper upgrade, this is a good level to earn the Ring the Bell trophy as this level is still easy to complete. Wait until the pepper plant has all five peppers, then pick it empty ten times. You will just have time to pick the last ones if you make your final customer wait. You do not have to have empty space on your tray or less than nine peppers on the counter, just pick the peppers.
Mouse location:

Emily's Place, Day 5
Two types of rice are available now. They can look similar in color in an order bubble, but the shape is different as well, which will help you distinguish between them.
Your task today is to feed Jimmy all he requests, and to do so before the meter runs out. Including his food in a chain does not contribute to the bonus.
Mouse location:

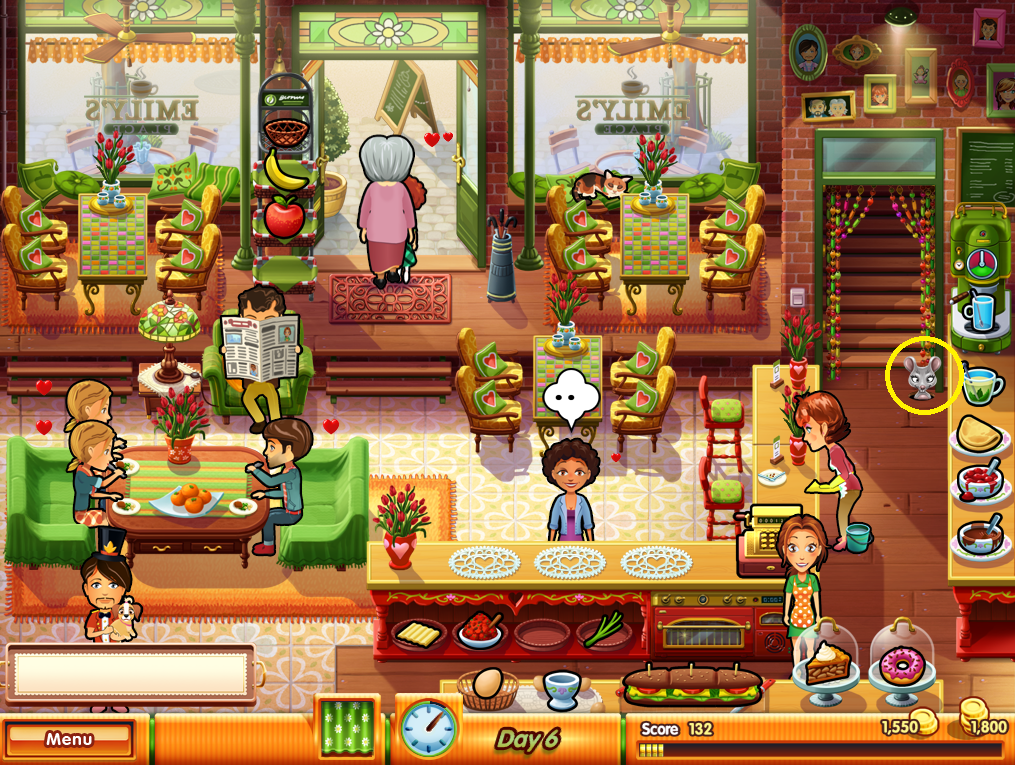
Emily's Place, Day 6
Francios is available as an entertainer now. To use an entertainer, click on the entertainer and then the table you want the entertainer to visit. The entertainer will entertain for a few seconds and then that table will gain a happiness level; you will hear a particular sound that signals that happiness has been gained. Using an entertainer will not prevent a customer from loosing happiness.
Tip: As this level is not as busy as it will be later in the game, this is a good level to earn the Let Me Entertain You trophy for entertaining all the seated customers in a day. Just don't forget to entertain the customers at the counter as well. However, this trophy can only be earned if you increase the happiness of your customers with the entertainer. This means that if you are playing on the beginner difficulty (when all customers arrive with full happiness) you won't be able to earn this trophy.
The first "pourable" food is introduced in this level. Click on the coffee machine and then click again when the meter needle is in the green portion. If you click too late, the coffee will spill and you'll have to start again. You can walk away from the coffee machine while it is pouring and it won't spill over as long as you click the meter in time.
Mouse location:

Emily's Place, Day 7
Today's task is to help Evelyn size the wedding dress. Click on Evelyn, and Emily will walk over and put on the dress. This is interrupted when you click on any food item or the cash register. Keep sending Emily over in between serving food to complete it before the level ends.
Mouse location:

Emily's Place, Day 8
Mouse location:

Emily's Place, Day 9
Today's task is to clean up after the party. Trash locations are noted below. To pick up the trash, hover the cursor over it until it lights up, then click on it and Emily will go pick it up. Then click on the appropriate trash can to throw it away.
Note: It can be difficult to get the trash pieces to highlight for Emily to pick up, so pay careful attention.
Mouse and trash locations:

Emily's Place, Day 10
Mouse location:


Carmen's Comedor
Carmen's Comedor, Day 1
Your task is to find the right luggage for the passengers. The thought balloon will show the luggage needed; click on it when it comes around on the conveyor belt.
To cook fried food, first click on the food and then the fryer. The frying sound will stop when the food if fully cooked; food will burn if left too long. When it is finished frying, click on it and then on the ketchup.
When you run out of ham slices, click on the large ham and Emily will slice more. You can have a maximum of five slices at one time.
Emily will have to clean tables, so plan accordingly.
Mouse location:

Carmen's Comedor, Day 2
To make cookies, click on the cookie and then on the chocolate sauce.
Mouse location:

Carmen's Comedor, Day 3
Today's task is to clean up the eight items. Item locations marked below.
Mouse and item locations:

Carmen's Comedor, Day 4
Mouse location:

Carmen's Comedor, Day 5
Sausage is now added and is sliced/stocked the same way as the ham.

After the day is through, there is a dancing mini-game. Watch Carlos's moves, then repeat them.
Tip: Don't worry if you haven't made expert by the end of the day, as completing this mini-game will most likely give you the needed points.
Mouse location:

Carmen's Comedor, Day 6
The rice dish is now available. Click on the rice, then on the clam and it will cook. The frying sound will stop when it is fully cooked; it will burn if you take too long removing it from the pan.
You now have an entertainer.
Tip: This is a good level to earn the Serving Charcoal trophy. This is earned by burning ten dishes but still achieving an expert score. The best way to do this is to keep making rice and fries and letting them burn. Keep a count of how many you are burning, as the trophy won't be awarded until the very end of the level after the score tallies.
Mouse location:

Carmen's Comedor, Day 7

The task for this level is to cheer up Carlos. Watch the green meter, and click on him for Emily to go and talk to him before it runs out. You will need to do this multiple times during the day.
Tip: Don't worry if you haven't reached expert score as you near the end of the day. The points from completing this task will added in at the very end of the day and will most likely give you the boost you need.
Mouse location:

Carmen's Comedor, Day 8
Mouse location:

Carmen's Comedor, Day 9
The task for this day is to deliver the food to the stewardess. You have a limited amount of time; be sure that all the food has been delivered before the green meter runs out. Including her food in a chain does not contribute to the bonus.
Mouse location:

Carmen's Comedor, Day 10
Mouse location:


Fresco's Diner Express
Fresco's Diner Express, Day 1
Your task for this day is to clean up the messes. They are marked with an exclamation point; click on one and Emily will walk to it and begin to clean up. You can interrupt her at any time by clicking on a food item or the register.
Emily is alone today and will have to clean the tables as well.
You can now have three customers at the check-out counter at one time, so plan accordingly.
To restock the magazines, click on the box on the right hand of the car. In the shop you can buy a monkey who will restock the magazines for you, when you click on him.
Build the salad by clicking on each individual ingredient in the proper order.
Mouse location:

Fresco's Diner Express, Day 2
To make toast, click on the bread and then the toaster. Toast will pop out of the toaster onto the toast stack. You can stack six pieces at a time.
To make the sandwich, first click the toast and then the cheese.
Mouse location:

Fresco's Diner Express, Day 3
Today's task is to catch the cart when it rolls away, which it will do multiple times throughout the level. It will roll out of the car and be unreachable if left to it's own, so be sure to have Emily retrieve it. Without the points awarded for this task at the end of the level, you most likely won't reach expert.
Mouse location:

Fresco's Diner Express, Day 4
Fruit juice is introduced. Click the fruit, then it will go into the blender. Wait until the meter needle is in the green and click again. If it goes into the red, it will spill and you'll have to start all over with it. After you click on the meter, then click the glass to pour the smoothie into the glass.
Mouse location:

Fresco's Diner Express, Day 5
Today's task is to feed the Inspector. Deliver all her requests before the green bar runs out. Including her food in a chain does not contribute to the bonus.
There is another possible ingredient for the salad, so pay close attention to what the customer orders.
Mouse location:

Fresco's Diner Express, Day 6
The entertainer is available now.
Mouse location:

Fresco's Diner Express, Day 7
Fruit juice can now be served over ice cream as well as in a glass, and is prepared the same way.
Today's task is to accept the packages when they are delivered. If you wait too long, the delivery man will leave.
One last ingredient is available for the salad; you'll have to pay close attention to the customer's order.
Mouse location:

Fresco's Diner Express, Day 8
Mouse location:

Fresco's Diner Express, Day 9
The task for today is to find the eight pieces of paper. Locations are marked below.
Mouse and pieces locations:

Fresco's Diner Express, Day 10
Mouse location:


Chez Jean-Paul
Chez Jean-Paul, Day 1
Emily will have to clean tables, today.
To make soup, click a bowl of soup, then the topping, to make the soup order. To restock, click the pot; you can have a maximum of six in a stack.
The task for today is to case away the doves. The locations are marked below.
Mouse and dove locations:

Chez Jean-Paul, Day 2
Mouse location:

Chez Jean-Paul, Day 3
The task for today is to catch Jean-Paul. When he appears in the restaurant, click on him. If you wait too long, he'll walk away.
Oysters are added; they are at the back of the restaurant, so plan accordingly.
Mouse location:

Chez Jean-Paul, Day 4
To cook lobster, click on the drawer to open it and then click on the lobster to put one in the pot. The pot will quit making noise and the lobster will change colors when it is cooked. Lobster will burn if left too long.
Mouse location:

Chez Jean-Paul, Day 5
The entertainer is now available.
Today's task is to return the ring to Jean-Paul's jacket. Click on the jacket and Emily will walk over to it to return the ring. You can interrupt this by clicking on any food item or the cash register. Continue to send her over until the task is complete.
Mouse location:

Chez Jean-Paul, Day 6
Crabs have been added and are cooked the same way as the lobsters. Only one crab/lobster can be cooking at one time.
Mouse location:

Chez Jean-Paul, Day 7
Today's task is to accept the deliveries. If you wait too long, the delivery man will leave.
Mouse location:

Chez Jean-Paul, Day 8
Mouse location:

Chez Jean-Paul, Day 9
Today's task is to feed Phillipe; serve him all he requests before the green timer bar runs out. Including his food in a chain does not contribute to the bonus.
Mouse location:

Chez Jean-Paul, Day 10
Mouse location:


Emily's Place (Emily's Return)
Emily's Place (Emily's Return), Day 1
Today's task is to speak to the four customers who come to inquire about Emily. It takes time, so play accordingly, but remember that they will leave if you take too long to respond.
To make lasagna, layer the noodles and sauce, then add the topping. Pay close attention to the customer's order as it can be layered with three noodles or just two. It will then go into the oven; the oven will ding when it is baked, but don't wait too long as it will burn.
To make the crepes, click first on the crepe and then on the fruit topping.
To make the latte, click on the coffee machine and then click again when the meter needle is in the green portion. If you click too late, the coffee will spill and you'll have to start again. You can walk away from the coffee machine while it is pouring and it won't spill over as long as you click the meter in time.
Mouse location:

Emily's Place (Emily's Return), Day 2
To make the eggs, click on the egg and then the egg cup.
Mouse location:

Emily's Place (Emily's Return), Day 3
Today's task is to call the puppy when she wanders off. She will bark and you will need to click on her quickly to call her, before she upsets the customers.
Mouse location:

Emily's Place (Emily's Return), Day 4
Sandwiches are available now, in either one, two or three pieces. To prepare, click on which section you need to make the right amount of pieces; for example, click the second section to prepare a two piece sandwich. Pay close attention to the order.
Mouse location:

Emily's Place (Emily's Return), Day 5
Fruit baskets are now available, and require three pieces of fruit to fill the basket. First click the basket, then the banana three times. (More fruit varieties will appear in later levels.)
Today you have to find the marbles hidden on the level. Locations marked below.
Mouse and marble locations:

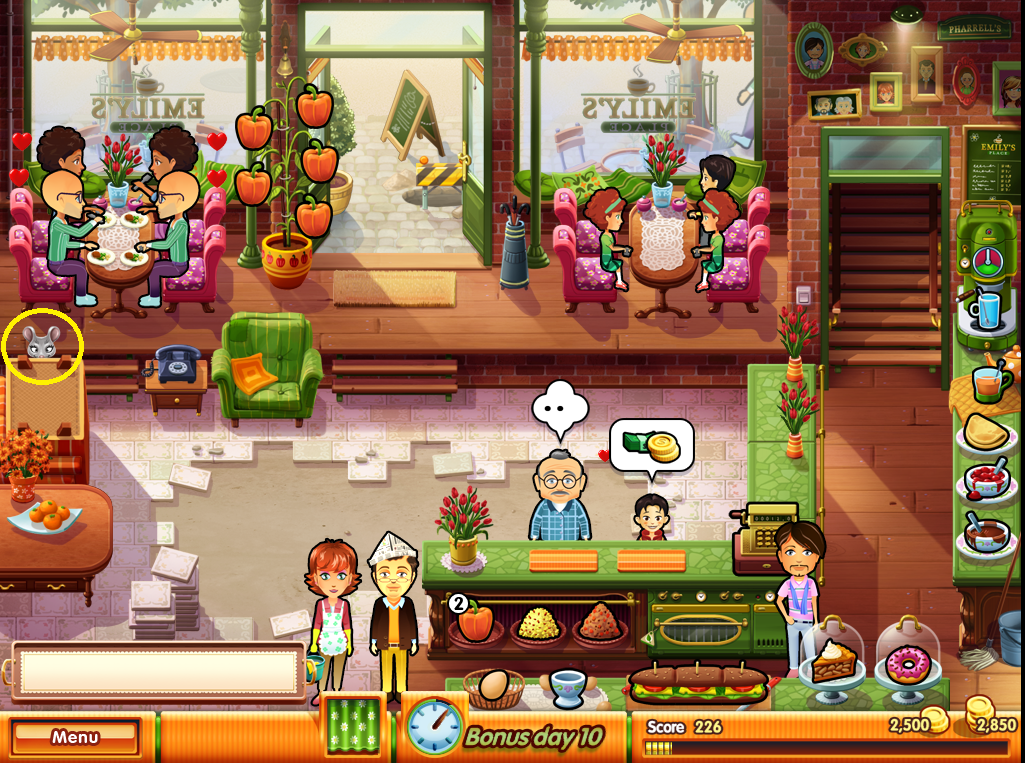
Emily's Place (Emily's Return), Day 6
Francois is available as an entertainer now.
Tip: Now that you have an entertainer, use him to keep all your table customers at full happiness, to receive the Ecstasy trophy.
Note: You may have to go back and play this on the beginner setting to achieve this. Also, don't wait for combos; serve and cash out the customers as quickly as possible to keep the full happiness level.
Mouse location:
Emily's Place (Emily's Return), Day 7

Before you start the restaurant day, you have to clean Emily's apartment. Click on the exclamation points for Emily to clean.
To make a basket of mixed fruit, click on the basket, then each of the fruits from top to bottom.
Tip: This is a good level to get the Three Variations trophy by having a basket of each fruit on your tray at the same time.
Mouse location:

Emily's Place (Emily's Return), Day 8
Lasagna now has a choice of two fillings. Pay close attention, as a two layer lasagna may be ordered with both. You will have to place the fillings in the right order, with tomato sauce between the first layer and pesto between the top.
Mouse location:

Emily's Place (Emily's Return), Day 9
There are special cookies that eight customers will request today, After you serve the cookie, then the customer will place the main order.
Mouse location:

Emily's Place (Emily's Return), Day 10
Mouse location:


Emily's Place (Francois' Place)
This restaurant is only available with the "Premium" edition of the game.
Emily's Place (Francois' Place), Bonus Day 1
This restaurant contains the same food as the first Emily's Place restaurant, but gradually changes over to the food in the fifth restaurant (Emily's Place, Emily's Return). The story takes place while Emily is traveling.
Today's task is to prevent Snuggy the cat from destroying the furniture. When he starts scratching, click on him and Francois will walk over to stop him. You will hear a sound of scratching when Snuggy starts.
Mouse location:

Emily's Place (Francois' Place), Bonus Day 2
Mouse location:

Emily's Place (Francois' Place), Bonus Day 3
Today's task is to place telephone calls. Click on the phone for Francois to walk to it. Don't let the green meter run out--the meter gets low much faster than it did with Carlos in Carmen's Comedor. You'll have to make multiple calls during the course of the day.
Tip: Don't worry if it seems that you won't make expert on this level. The points from this task come at the very end of the level and will probably give you enough for expert.
Mouse location:

Emily's Place (Francois' Place), Bonus Day 4
Mouse location:

Emily's Place (Francois' Place), Bonus Day 5
The task for today is to receive the packages from Chuck the delivery man. He will leave if you take too long.
Mouse location:

Emily's Place (Francois' Place), Bonus Day 6
Edward is now available as an entertainer.
Mouse location:

Emily's Place (Francois' Place), Bonus Day 7
Today you have to feed Jimmy and Angela. Be sure to serve them all their requests before the timer runs out. As in previous levels, including their food in a chain doesn't result in a combo bonus.
Mouse location:

Emily's Place (Francois' Place), Bonus Day 8
Mouse location:

Emily's Place (Francois' Place), Bonus Day 9
Today's task is to pull up the tiles. Click on the spot and Francois will go to work. You can interrupt him any time by clicking on a food item or the register. Then click back on the spot to continue.
Mouse location:

Emily's Place (Francois' Place), Bonus Day 10
Mouse location:
Ive been trying to get the oops i did it again ive tried several different ways and ive deleted more than 20 items from my tray and it won;t give me credit
ReplyDeleteI had to try several times, and finally discovered that you have to win the level with the expert score to earn the trophy. I did it on level 1, so that it was easier to still get expert. Have you tried that?
Deleteyes is there any specific items i need to try?
DeleteI went back, started a new game and tried it on level one, and I'll be darned, I couldn't get it to work either!
DeleteSo, I went to level two, and deleted cookies, cheesecake, and drinks, then went on to get expert. After the level was over, and the cut scenes were played, I finally got the trophy! I'll note that in this walkthrough! Hope it will work for you, too!
IT WORKED THANK YOU SOOO MUCH
DeleteThis comes very late, but I'll give my 2 cents. :) I was able to complete this without doing it in one level. The game tallied it across 2 levels, as long as I deleted 20 of those items total. Hope this helps.
DeleteThanks! Hopefully that will help someone else!
Deletethank you i will try
ReplyDeleteThis comment has been removed by the author.
ReplyDeleteI just can't find the mouse in Emily's Return Day 8. The walkthroughs on here and Gamehouse don't help.
ReplyDeleteThere is a screenshot of it here on this blog, under on Emily's Place (Emily's Return) Day 8. It's circled in yellow. It's on the right hand side, between the window, the wall, and the chair.
Deletecomment faire pour avoir le trophé de faire de la place où il faut nettoyer la table juste avant l'arrivée des clients j'ai essayé plusieurs façons mais je n'arrive pas à avoir le trophée c'est le seul qui me manque
ReplyDeleteThat trophy depends on luck, honestly. I earned it in the first restaurant, when Evelyn was cleaning tables, and it just happened without any planning. I would suggest to wait a little bit before sending her to clean tables, instead of cleaning them right away, and maybe it will happen for you. Sorry that I can't help!
Deletemerci beaucoup de votre réponse je vais encore patienter et essayer merci merci
DeleteHey can you help me with the trophy three variation? I can't do it by the fruit
ReplyDeleteMy tips are on the post for Emily's Place (Emily's Return), Day 7. Good luck with it! =D
DeleteI cant either. I've given up.
DeleteMake three baskets of fruit, one of each type of fruit, and have them on your tray at the same time. That is how I achieved it.
DeleteThank you so much for reply my comment <3
DeleteI have been trying to get this trophies have followed your tip and it hasn't worked at all I've done every combination when I open day 7 it only has bananas and apples no pears. Done it on different levels and it still won't work
DeleteDo you mean that the level has no pears at all? Do any of the levels have pears? (You can see from my screenshot that my levels do have pears.)
DeleteDay 7 on Emily's Return does not have pears, honestly I think the screenshot is wrong and relook at the level to make sure it's the right day because I changed difficulty 3 times and no pears. I'm trying for 3 varieties
DeleteAs you can see from the screenshot, it is day 7. I didn't fake it; I have no reason to do so. I have posted the screenshot as it was when I played the game. I am playing on PC, and I am playing the original game -- I bought it when it first came out. It could be that they have upgraded/changed the game for other platforms. I don't have an answer. All I can do is post the walkthrough for the game I played, which I did.
DeleteIt's day 8 not 7. And no the fruit doesn't work. If you go back to day 7 now the person is right. You have to do three types of rice in Carmen's place. Also your screen name is literally a slur against Romani people.
DeleteMy screen name is the name that is on my birth certificate.
DeletePerhaps you are playing on iPhone or an app? I am playing the original PC game. They may be different. If you don't like my walkthrough, you most certainly do not have to use it.
@Gypsi I LOVE and have used I’m pretty sure ALL of your walkthroughs. Thank you very much for all the effort.
DeleteKarin, thank you so much! That makes it all worth it!
DeleteI just want to say I love your page and I got all the trophies with a little help from you. Thank you
ReplyDeleteOh, thanks so much for the kind words!
DeleteHi, how do I get the "making some room" trophy? I keep on thinking I got it but I end up failing to every time... seems hard...
ReplyDeleteTry on the early levels, when the customers have more patience. Wait until the customer is coming in the door, then click on the table to clean it. Good luck!
DeleteI finally figured the Making Some Room Trophy out. Make sure to check out the customer/s sitting at the table first, then let the new customer/s get to the dirty table and stand beside it before sending Emily or the cleaner to clean the table.
DeleteThis helped me so much. Also for the Making Some Room trophy, it probably has to be elderly customers. The young customers are too impatient. I couldn't get there in time to clean the tables. They would leave. Finally some elderly customers came in and stood next to the table. I had enough time to get to it.
DeleteI'm so glad it helped -- hopefully anyone else having trouble will see your tip about the elderly customers!
DeleteI finished the game, but lack of money for Shopping Spree.
ReplyDeleteThe only way to have enough money is to finish each level with an expert score. You can go back and replay the levels that you didn't earn expert on, and will get the money you lack.
DeleteHi! Has anyone playing on an iPad recently been able to get the Three Variations trophy? I have the pears starting on day 8. On days 8, 9 and 10 I did all three fruits but don’t get the trophy
ReplyDeleteAnd they are all three on your tray at the same time, right? I wonder if there is a bug? I hope you are able to get it to work, or that someone will see this and be able to help!
DeleteYes, I had all three fruits and also a basket with one of each on the tray. I also tried having the 1, 2 and 3 pieces of the sandwich on the tray at the same time. It must be a bug on the mobile game. Thanks for responding!
DeleteI noticed there was an HD version of this game so I tried it. I was able to get the three variations to work on this version
DeleteReplaying this game and cannot get the trying for target trophy. Help!
ReplyDeleteThis was a hard one for me, too. If you normally achieve expert, getting this trophy can be frustrating. Here is what I did to win it: Play on the advanced setting. Don't click on the mouse, as it gives +100, Don't serve full orders (serve everyone in two trips), since full orders give a +5 bonus. Don't make any combos, as they give a score bonus, too; check out and serve one at a time. Good luck!
DeleteI have tried everything to obtain this trophy, to no avail. If anyone has completed this and is willing to share, I'd appreciate it.
DeleteI'm so sorry my explanation didn't help you any! Maybe someone else will have an idea that can!
DeleteWhoop there it is! I finally just accomplished it! Level 7 of Chez Phillipe.
DeleteI meant day 7 Advanced Mode of Chez Jean-Paul...not Philippe :)
DeleteYay! I'm so glad!
DeleteThank you...I got caught up in the excitement of finally achieving it and made the error. :P
DeleteFor anyone having trouble obtaining Trying For Target, I had to replay this level 3 times in a row.
DeleteTo achieve this trophy, I played on expert mode, ignored the mouse, did not serve full orders, etc. So, when I reached the target score, I let everyone else leave mad until the restaurant closed.
DeleteThat's pretty much what I did, too, Michelle. I'm glad you were able to get the trophy!
DeleteThanks for your response. I have tried all these. Any idea which levels would be easiest to accomplish this?
ReplyDeleteI would try the hardest levels in Chez Jean-Paul, when the customers will be quicker to lose hearts -- maybe Day 9 and not feed Phillipe.
DeleteI know this comment is late, but I just completed this...finally. Advanced level Day 7 of Chez Jean-Paul. Serve items in two trips. Good luck!
DeleteHi. I'm currently going through "Emily's True Love" (and I've almost gone through to the end), earning those trophies that are left. So, you wrote that in order to earn the trophy "Oops, I did it again" you need to remove 20 items from the tray (respectively, it is also written in the game itself). But what an incident I had, I still earned this trophy, but not because I removed 20 items from the tray, I had to remove as many as 50 items!!! Do you understand? 50! Just tin.
ReplyDeleteThey may have changed the game since I wrote the walkthrough in 2016, especially if you are playing the mobile version. I hate that it didn't work for you, but I just wrote what worked for me when I played it.
DeleteHow do you do making room? I have all the table without cleaning them and when someone stand beside them, then I clean it and still did not get it. Can you not get it in the first Emily’s place? Can you please explain me how the hell I’m doing this in baby step
ReplyDeleteGive me a bit to play the game again and I'll see what I can find out for you. It's been a while since I've played this one. I'll get back to you soon!
DeleteI got it on Day 2 of Emily's Place. I kept the table dirty that is already dirty at the start of the level. Then, I waited to clean the other table until a party showed up and were actually standing beside that table. As soon as I cleaned it, the achievement popped up. Now, I am playing the original game on PC. If you are playing the new mobile port of the game, it could be that there is a glitch. But, for the PC original, what you have been doing should get it for you.
DeleteEstou numa maratona dos jogos da Emily, sou apaixonada por essa série, é tão nostálgico, fez parte da minha infância. Estou jogando de forma descontraída, mas sempre pegando expert nas fases. Os troféus são mais difíceis de eu pegar todos, mas estou tentando o que consigo. Seus posts tem me ajudado a caçar os ratos e os troféus :D Muito obrigada, amigo S2
ReplyDeleteApesar de não ter consigo pegar o "Ring the Bell" - tentei três vezes, mas desisti depois, estou no primeiro restaurante ainda -, estou me divertindo muito, não quero me frustrar tentando conquistar todos os troféus.
Mais uma vez, obrigada pelos posts <3
I am glad I have helped! Getting the "Ring the Bell" trophy was hard, but I think level 4 of Emily's Place is the best level for getting it. I hope you are able to get all the trophies without getting too frustrated and have a lot of fun with the game!
DeleteOlá, amigo! Eu consegui o "Ring the Bell"!
DeleteEu achava que para conseguir o troféu eu precisaria colher os pimentões quando o a caixa de armazenamento tivesse vazia. Mas não, era só colher, mesmo que a caixa já estivesse cheia de pimentões :D
Obrigado pelas palavras. Estou me divertindo muito. Agradeço a ajuda S2
I'm so glad! I need to make a note of that, in case anyone else has the same problem!
DeleteTerminei o jogo! Que delícia de jogo, é tão divertido, os personagens são tão adoráveis. Obrigada por me ajudar, amigo S2
ReplyDeleteBom, eu não peguei todos os chocolates, faltou dois apenas, o chocolate da "Intuição Feminina" e o "Objetivo Simples". Eu tentei fazer a intuição no segundo nível e não foi, mas tudo bem. O do Objetivo simples é muito frustrante, não queria jogar novamente três fases, por isso nem tentei kkkk (<-laugh in portuguese).
De qualquer forma, obrigada <3 Nós vemos no casamento da Emily :D
So glad I could help! You did great to get all but two of the achievements!
DeleteHello. I cannot use the entertainer with your instructions—clicking on them and then the table I want to use them on. I’ve tried all difficulties. Am I doing something wrong? I’m using the Android version, but the steps shouldn’t be too different. Thanks in advance.
ReplyDeletePer my previous entertainer comment, all I can do is just send Emily to the table when I click on the entertainer. Would appreciate a solution to this, thank you.
ReplyDeleteI can't give you any technical help at all, not being affiliated with the game makers. All I can say is that with the PC version, you click on the entertainer, then you click on the table, then they will walk to that table. Are you having trouble on just one level or all of them?
DeleteHi. Just providing an update on the Making Evelyn Proud trophy. It is possible to earn this trophy by Level 2 of Emily's Place. Here's how I did it. I earned the Making Some Room and I'll Take Them Two (Serving the same order back to back) trophies on my 1st attempt of Level 2. I replayed this level until I earned the Women's Intuition trophy. After earning Women's Intuition, I replayed Level 2 again, solely focusing on earning the Oops I Did It Again trophy, at which time I also earned the Evelyn trophy. Due to replaying this level so many times, I was able to earn Making Evelyn Proud early on. For some reason, Women's Intuition & Oops I Did It Again took an absurd amount of replays to earn, despite meeting the requirements long before earning them. This may not be the fastest way of earning these trophies, but I was glad to clear that many out of the way early on.
ReplyDeleteNote that I purchased the pepper plant after completing Level 2, as it's needed to earn the Ring the Bell trophy in Emily's Place, Day 4. Hope this isn't confusing.
Thanks for the input!
DeleteYou're welcome!
ReplyDeleteI just wanted to say thank you Gypsi for all the effort you've put into these walkthroughs over the years. I was just reading the old comments on this page. Some people come off very ungrateful and downright rude. The one that accused you of racism after asking for your help was selfish and very uniformed. Guess that person didn't realize that the racial slur is spelled GypsY. I'm really sorry you've had to deal with that. Thanks again. :)
ReplyDeleteYou are so kind and I really appreciate your saying that! I'm glad to be of help!
DeleteI have an annoying with Carmen’s Comedor Day 7 mouse. I’m playing on the latest iOS and the screen cuts off the top part of the telephone so I can’t get the mouse. Anyone know of a fix?
ReplyDeleteOh that's too bad! I wonder if GameHouse knows? Have you tried contacting them?
DeleteHey trying to completeionist all the Emily games here and I'm having a a lot of trouble with the "Making sone room" trophy, playing the game on pc from the GH website, could you help me?
ReplyDeleteI replayed this in 2024 to help another commenter, and this is how I did it:
DeleteI got it on Day 2 of Emily's Place. I kept the table dirty that is already dirty at the start of the level. Then, I waited to clean the other table until a party showed up and were actually standing beside that table. As soon as I cleaned it, the achievement popped up.
I hope this will help you! There are some more commenters with suggestions of their own up in the older comments. Good luck!
Thank you! I managed to get it today after restarting the game again, so glad I'm so close to my goal!
DeleteI'm so glad! This one has SO many achievements! I really had to work to get them all!
Delete